Monster Hunter World - Weapon and Armour Upgrade Guide
Posted in
monster hunter world
Monster Hunter World has an extensive weapon and armour crafting system which has been simplified since the previous installments of the game. In this guide I'll be covering the many aspects of crafting, helping you understand how to upgrade weapons and armour to achieve better variants, both aesthetically and statistically.
Before the days of Monster Hunter World (MHW) players had to crawl the vast depths of the internet for information on the games crafting and upgrade mechanics. Starting in MHW, players have the luxury of new UI elements to easily check equipment upgrade trees and create watchlists for tracking priority upgrades. As a veteran player, I agree with this change since the game is aiming for a global audience this time.
The sections below will help you understand the various aspects of upgrading equipment in MHW including sections for understanding crafting materials, how to upgrade and even ending with a short explanation on downgrading equipment - a new feature in MHW.
Upgrading
Upgrade Materials
At the start of Monster Hunter World you are given several weapon types, each of which can be turned into 3-5 other weapons through upgrading. You won't know what the upgrades are until you start collecting upgrade materials.
Monster parts![Monster part quest reward]()
For the most part, the best upgrades in the game require Monster materials e.g. hides, claws etc. A simple example is the Jagras upgrade path which requires three pieces from the Jagras monster: Great Jagras Claw, Hide and Scale. As you progress through the game and reach the higher level monsters such as the Elder Dragons, new and exciting upgrade options will become available.
You may have briefly seen that some upgrades appear with ??? (question marks) next to their slot. These are upgrades are for recipes which you haven't discovered the "key" materials for yet.
Important: Players should always remember to carve a monster after defeating it to claim monster parts. Simply sheath your weapon then stand by the dead monster and press the appropriate button (circle on PS4) to carve the parts. It's important to do this before the timer expires and you exit the quest.
Other resources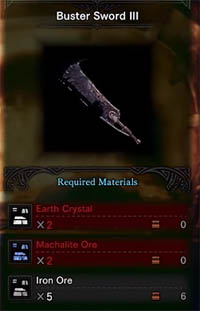
In contrast, simpler weapon types such as the Buster Sword require common materials or ores that do not come from Monsters such as Earth Crystal and Iron Ore. Players will find these upgrade resources within open areas of the map and there's no need to fight particular monsters in order to claim them. Simply using the pickaxe is enough to farm these particular resources. Since these upgrades are typically accessible outside of fights, players can improve equipment for a particularly tough upcoming monster.
Where to upgrade
![Forge area]()
Unlike medicines and other consumables, weapons and armour cannot be upgrade on the fly or in the middle of a hunt. Players must return to the central Astera hub and visit the Forge area. This Forge room is shown in the screenshot above - it's a circular room with metal pipes and a huge furnace at the rear. Players should also note that equipment cannot be changed in the middle of a hunt, unless the player returns to one of the base camps they have unlocked.
A particular NPC who resides in the Forge, called the Smithy, is the person to talk to if you want to start the upgrade process for equipment. Upon talking to the Smith, players can choose from one of the following options:
- Forge Equipment
- Upgrade Equipment
- Forge Palico Equipment
- Customize Bowgun
- Manage Kinsects
- Change Equipment
Selecting "Upgrade Equipment" will allow you to upgrade any weapon or armour piece that you possess. Take note of the two specialised upgrade options for the Bowgun and Kinsects, more on these at the end of the guide. Your faithful companion, the Palico, also has a set of upgrades which can be accessed from this menu.
How to upgrade equipment
![Upgade equipment screen]()
After opening the Upgrade Equipment screen, highlight the item of equipment you would like to upgrade. Notice the upgrade options that appear at the bottom of the screen. Items that are bright white are available to upgrade now, whilst gray items resemble upgrades that you do not have the required materials for.
From here players can also open the Upgrade Tree screen, shown below.
![Upgrade tree example]()
It's easy to see which upgrade paths are available now and which others will become available soon. Simply follow the upgrade tree line from left to right and you'll know when particular branches will become available.
For example in the image above, the player is on the third column of the upgrade tree, which has three possible branches: Buster Sword III, Jagras Blade or ??? Tree. The Buster Sword III would continue the linear path, whilst choosing Jagras would branch into a seperate upgrade path for a new weapon altogether.
The player has the option to venture into the Jagras path at this stage since all four crafting materials have been collected (Jagras Claw, Jagras Hide, Jagras Scale, Sharp Claw). A small amount of money is also required to complete any upgrade.
If happy, the player accepts the upgrade and the materials are removed from their inventory and the new upgrade appears on the Forge conveyor belt, ready to pick up and start using in combat.
WishlistThe Wishlist is a handy addition to MWH. It allows players to select upgrade paths (for which they do not have all the materials) and then the game immediately notifies when these important materials are collected. This is a huge improvement, that in the long run will reduce the number of trips to the Smithy to see which upgrades are now available, especially useful following a lengthy expedition or tough monster hunt.
Upgrade numbers (numerals)Next to almost every piece of equipment is a roman numeral e.g. I, II, III etc. The higher the numeral the better the upgrade (for that particular weapon). So for example Jagras Blade III is of course better than Jagras Blade I.
As you upgrade in a linear path, the numerals will always increase, but as you branch to a new weapon type, the numerals reset back to I. Without comparing stats, you cannot compare separate weapons simply by the numeral after their name. For example, it would make no sense to believe that Buster Sword III was better than Jagras Blade I.
What does ??? meanAn upgrade item with a ??? basically means you have not found (yet) the "key" parts required to upgrade to this item. Some upgrades are kept a secret until you actually defeat a particular monster.
What to upgrade firstMost players will agree that "maining" 2-3 weapons, i.e. choosing 2-3 weapons to focus on, is the best strategy in Monster Hunter. It takes considerable time and effort to collect the materials required to upgrade a weapon and you won't be given ample supplies. Therefore it's important to choose which weapons you enjoy the most early, and then focus on upgrading those for the end game.
As for armour, it's all about the defense stats and the bonuses from "set" gear (armour all from the same group/name). Armour comes with skills and you'll want to mix and match the skills that complement your play style, whilst ratcheting up the defense rating as you go along.
Unlike weapons, armour does not have upgrade trees. Players can use Armour Spheres to enhance the defense stats but if you want an entirely different armour set, then these must be forged from scratch.
This is a very simplistic view but time has shown that focusing on a core set of equipment is better than spreading your efforts too thin.
Downgrading
For the first time in the Monster Hunter series players can actually downgrade pieces of equipment. This is immensely important for saving wasted materials and avoiding having to craft brand new weapons just to enjoy the other various upgrade paths.
When players downgrade a weapon, the parts and materials used in the original upgrade are returned to your inventory, ready to use again. The upgrade node shifts down a level (to the left) and alternate upgrade paths become available again.
Specialized Weapon Upgrades
Bowgun Upgrades
![Bowgun upgrades/mods]()
From the Smithy selection menu, players have the option to apply Bowgun upgrades. This is a rather complex screen but essentially boils down to weapon mods. The higher the level of Bowgun you have, the more mods that can be applied. Choose the right mods to match your playstyle from a list that includes Reload Assist, Deviation Suppressor, Close Range Up, Ranged Attack Up and several others.
Kinsects
![Kinsect upgrade menu options]()
Similar to the Bowgun, the Insect Glaive also has its own dedicated upgrades, that influence the little insect that you send out to collect buffs from monsters. New in MHW, the kinsect actually resides separately from the Glaive itself, allowing you to hold several Glaives and switch Kinsects between each of them - basically Kinsects are not hardwired into a particular Glaive.
Types of Kinsects you can nurture include Culldrone, Rigiprayne (Healing), Windchopper (Speed), Mauldrone and several others. Unlike other Monster Hunter games where you would feed Kinsects different necters, in World you actually upgrade Kinsects using Monster parts. Players can also apply Elements to Kinects individually through the Smithy menu.
At the start of the game, you can purchase Kinescts directly from the Smithy to get you started.