How to create a Minecraft mod? - The Complete Tutorial
Posted in
minecraft
This tutorial will guide you through the process of decompiling the Minecraft source code and editing particular sections of code to create your very own Minecraft mod. In fact it's not as hard as you might think to create your own Minecraft mod.
It's recommended that you have some programming experience, but it's not essential. Most people find it easy to look up Java commands online and enjoy the challenge of learning something new.
Java what!!?
In case you've never heard of Java, its an object oriented programming language, similar to the latest .NET development languages like C#. However, it's been around far longer and is widely consider the original true developer language of choice. Java code is separated into logical units called classes that make it easier to reuse pieces of code. They also make it easy to manage large projects such as Minecraft.
Don't let all that programming jargon put you off, Minecraft is actually really well structured making it easy to make modifications.
Applications you'll need to edit Minecraft source code
Before you can create a mod, you'll need to download the following applications:
1. Java SDKThe development kit that lets you compile Java code into executable programs.
Java SDK2. MCP – The Minecraft Coder PackThis is an awesome pack that contains a selection of folders and batch files to help you decompile java code, obfuscate code and run mods in a test environment. You've got no chance without this!
Minecraft Coder Pack3. Notepad++ - A Source code editor with syntax highlighterNotepad++ is a free application that makes editing source code much easier thanks to its syntax highlighter. It's far better than the bog standard notepad you get with Windows.
Notepad++Step by step setup
1. Install the Java SDK (accept the defaults)
2. Install MCP, we recommend choosing C:\MCP as your installation folder
3. Install Notepad++ (again accept the defaults)
4. Create an environment PATH.
Just right click on My Computer and click Properties. Go to the Environment Variables section. Scroll down the list of System Variables and edit the PATH variable. Add a semi colon at the end and paste the full path to the bin folder of the Java SDK e.g.
C:\Program Files\Java\jdk1.6.0_24\bin
5. Copy the Minecraft
bin and
resources folders from your Minecraft installation folder into the
jars folder of the MCP installation.
e.g. C:\Documents and Settings\User\Application Data\.minecraft\bin --> C:\MCP\jars
Decompiling the Minecraft source code
If you've ever had a dig around the minecraft.jar file you'll have seen a tonne of Java class files. It's no good opening these files up and attempting to change a few things because the code is compiled and obfuscated. Its just doesn't make any sense, even in coding terms! And that's the point of obfuscation, it's supposed to be compact and smaller in size.
To be able to view the original Minecraft source code you'll need to turn to our friend MCP and decompile it using their pre-built batch files.
The batch file (.bat) we're looking for is called decompile.bat and it's located in the root of the MCP installation folder. Just double click it to start running.
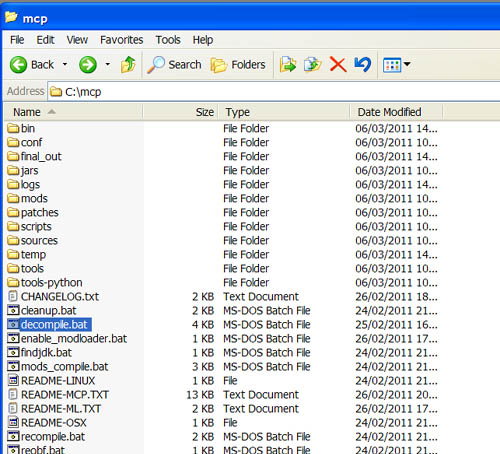
Ok, now we've got the full original Minecraft source code! Its saved in the MCP\sources folder. E.g.
C:\mcp\sources\minecraft\net\minecraft
If you open the src folder, you'll notice that all the original Minecraft class files are fully readable and the code actually makes some sense.
Editing a Minecraft class file
Ok, so you've got all the original source code..now what?
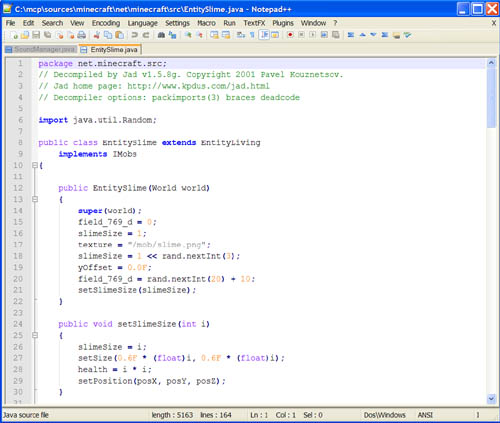
Now the fun begins, all the Minecraft class files are named appropriately. For example, we have an EntitySlime.java class that controls the Slime mod creature. It's got methods to control the mobs texture, the sound to play when it gets hurt and like other mobs the onUpdate method controls what the mob does on each update.
If we wanted to edit how the Slime mob behaves we would need to edit the EntitySlime.java file. To do this we turn to our next friend - Notepad++.
Just open Notepad++ and drag and drop the EntitySlime.java file onto the notepad text editor. It will look something like this:
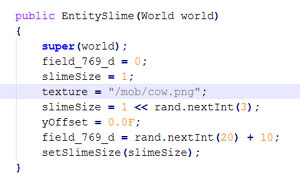
In this example, we're going to just change the texture that the Slime mob uses (it's a good example if you wanted to copy the Slime mob, create a new minecraft mob and also use your own texture).
Ok, so just type into the text editor and change the texture. In this example, we'll just change it to use the cow texture because we're not going to create a whole new texture.
Recompiling the source code
Now that you've made your change its time to recompile the code. Just run the recompile.bat file and the code will be compiled again.
If there are any errors during compilation (if you have any syntax errors i.e. your coding is dodgy) you can find these in the MCP\logs folder in the minecraft_compile.log file.
If there are errors, you'll need to correct your mistakes before you can test your changes. Go back and review the code changes you made, did you type something by mistake?
Testing the new changes
After the codes compiled, you can run the new Minecraft code using the MCP file called test_game.bat. Just double click the file and Minecraft will run as usual.
Obfuscating your changes
If you want to distribute your changes to other Minecraft players and post them on the Minecraft Forum you'll need to perform a few more steps.
1. Firstly, open the MCP\conf folder and edit the client_obfuscation.txt file. Clear the text in this file and replace it with the names of the classes you have changed .e.g EntitySlime. It's one class per line. Now save the file and close it.
2. Run the reobf.bat file by double clicking it (its in the root of the mcp folder).
3. Your changed classes will be saved in the MCP\final_out\minecraft
4. These will look like the obfuscated files you find in the minecraft.jar file e.g. qm.class
5. These classes are ready to distribute as a new mod..congratulations!!
Tips
- Don't expect success overnight, programming takes time. Get familiar with the Java language and learn from the code that Notch has created. It's taken him years to get this far, so respect his work and learn from it!
- Start simple, change a single line of code, recompile and test the changes. The key to success is change little and test often. Its easier to find mistakes if you haven't changed tonnes of code before testing it.
- If you want to distribute your new mod, don't make large changes to Minecraft class files as they could conflict with other mods. Try and separate your mod as a new class and hook into it with minimal code.
- Once you've had a bit of practice using MCP and trying to create a mod, why not try using the test_mod.bat file? This allows you to enter commands into the Minecraft environment and test conditions and execute methods.
- If you distribute mods, keep em clean! Others might want to expand your mod later so make it nice and readable like Notch has done.