How to increase Minecraft memory and fix "Out of Memory" performance errors
Posted in
minecraft
If you've come across the Out of Memory, Saving Chunks or some serious lag problems then we recommend you give the following a try. This tutorial will guide you through how to increase the memory allocated to Minecraft and hopefully stop those errors from happening.
Before we begin, we're assuming that you're pretty computer savy. Enough so that you can create and rename files, look up installation folders etc. Ok, if that's you then carry on.
As you probably know, Minecraft runs on Java. It's the worlds most popular cross platform development language. It's been around for a long time and it's also great for writing games. Downloading and installing Java is easy and almost every computer comes with some form of Java installed. Before you attempt this guide, you should download the latest version of Java.
As a quick overview, we're going to explain the steps in a brief summary.
Ok, so we're going to create a batch file which is used to execute actions in Windows. We're going to tell the batch file to run Minecraft but with some added memory settings. This can be tailored to your machines needs so you get the most out of Minecraft.
Following these steps will help you run high definition texture packs, new mods and generally improve the lag problems during the game.
Ok, follow these steps..1. Find where the Java installation folder is on your computer.
It's going to be somewhere under Program Files. For example:
C:\Program Files\Java\jre6Keep the explorer window open as we're going to copy the path later.
2. Find where the .minecraft folder is.
The quick way to do this is to type
%appdata% in the run command window. E.g.
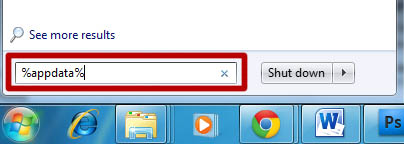
Keep this window open because you need to copy the path later.
3. Check the amount of memory and OS version your computer has.
The best way to check this is to right click on My Computer and select properties.
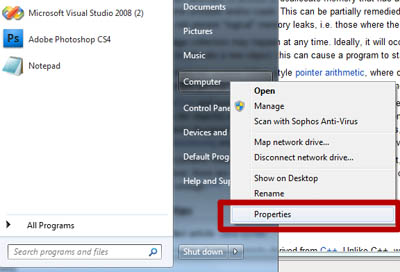
Next to the Installed memory (RAM) section you should see the amount of RAM your computer has e.g. 4GB. Remember this number, you'll need it later.
You should also see which version of Windows you are running under System Type. Check if you've got 32bit or 64bit version of Windows.
4. Create a batch file
Ok, this is the tricky part. Create a new text file called morememory.txt or something similar. This file can be anywhere on your computer. Then open the file (notepad is the default editor but any text editor will do).
5. Edit the batch file
Type in the following text:
"C:\Program Files\Java\jdk1.7.0_04\jre\bin\javaw.exe" -Xmx8192M -Xms8192M -jar "C:\Users\Me\Desktop\Minecraft.exe"6. Configure the settings
Now replace the text with some of the things we found earlier.
The first path is the path to the Java installation folder. So make any amendments necessary. E.g.
C:\Program Files\Java\jre6\bin\javaw.exe
The -Xmx8192M and the -Xms8192M setting refer to the memory we want to give Minecraft. Remember the version of OS you checked earlier? Well, if you're running the 32 bit version of Windows then the maximum value you can have is 1g (which means 1GB).
If you are running the 64 bit version of Windows you can increase this value much higher.
The maximum value you want to choose should be less than your total memory and ideally around the 75% mark. So if you've got 4GB of RAM then you could choose 3g as the setting which would look like this:
-Xmx3g
OR
-Xmx3072M
You can use either g or M. g stands for giga bytes and M for mega bytes. There are 1024 MB in a GB.
Just make sure that Xmx and Xms are the same value.
Finally, we need to change the path to our Minecraft folder we found earlier.
7. Check text is ok
Your final batch file might look something like this:
"C:\Program Files\Java\jre6\bin\javaw.exe" -Xmx3g -Xms3g -jar "C:\Users\psmith\roaming\Minecraft.exe"Just remember these tips:
- Use quotes around the file paths
- Keep the hyphens before the memory settings for Xmx and Xms
- Don't remove the -jar
- Make sure there are no spaces between Xmx and your memory setting e.g. Xmx3g
8. Add a little more text (OPTIONAL)
If you're worried that you may have typed something incorrectly, you can add a pause statement to the batch file. This will help you to read any error messages if your parameters were typed incorrectly.
Type pause under the line above.
9. Your final file might now look like this (OPTIONAL)
"C:\Program Files\Java\jre6\bin\javaw.exe" -Xmx3g -Xms3g -jar "C:\Users\psmith\roaming\Minecraft.exe"pauseImportant: There should only be 2 lines of text in the file.
10. Now rename the file
You need to rename the file so it is called
morememory.bat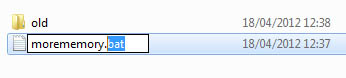
Tip: If you can't see the file extension then you'll need to change your view settings for windows folders.
11. That's it, now just run the file
Now you can double click the morememory.bat file just as if it were a shortcut or any other file. You should see a black command window popup briefly and Minecraft will start automatically.
Tip: During the game, you can press F3 to check the amount of memory that's in use.
WarningIncreasing the amount of memory that you give to Minecraft doesn't always work but it's one of the best techniques. If you're still having problems then you should try some of the other recommend performance tips. We've found that closing and stopping other non essential programs is one of the best. If you're not on the net then disabling your antivirus temporarily can really help. Also shut background programs and services such as uTorrent, Live Messenger, Skype etc..
If you've got an older computer then adding more memory (RAM) is the ultimate solution but you're going to have to spend some money to do that.