Witcher 3 Walkthrough - Bear School Gear Quest
Posted in
witcher 3
Hopefully you've made it through the other Scavenger hunts and are looking for the final challenge? And so onto the final and easily the best of the Treasure Hunts called the Bear School Gear quest. Here you will find the complete tutorial for claiming these top tier armour and weapons for yourself.
A friendly warning...First before we start a friendly warning. As this quest rewards you with potentially the best gear for completing the entire game, you can expect a serious fight to get it. I'm talking about high level monsters galore: level 20 wraiths, gargoyles and ice elementals. Therefore, you need to be at least level 10 on easy difficulty or close to or above 20 on any other difficulty.
Make sure you've crafted up the Thunderlord potion for extra strength, maxed out some of your combat Abilities (skill trees). Bombs would also prove useful and for some of this quest.
I opted for Northern Wind (a freezing bomb) to disable enemies for a clear attack path. On top of this you'll also want to Meditate often to heal yourself and save the game after key moments - or else risk restarting from an earlier point.
Finally, the most important part. This quest takes place on the Skellige Islands which only unlock once you've worked through a good chunk of the main quest line. In order to make it to the islands you'll have to start the Destination: Skellige quest which requires at least 1000 coins and entrance to Novigrad to start. You can't swim or sail your own boat to Skellige as far as I know!
Complete video tutorialIf you prefer the video guide click the link below, otherwise keep reading...
 YouTube Walkthrough video
Quest Rewards
- Witcher Gear Diagram: Ursine Steel Sword (1 of 7)
- Witcher Gear Diagram: Ursine Silver Sword (2 of 7)
- Witcher Gear Diagram: Ursine Crossbow (3 of 7)
- Witcher Gear Diagram: Ursine Armor (4 of 7)
- Witcher Gear Diagram: Ursine Boots (5 of 7)
- Witcher Gear Diagram: Ursine Gauntlets (6 of 7)
- Witcher Gear Diagram: Ursine Trousers (7 of 7)
Quest Steps
Travel to the ruins, south of the main Skellige Island
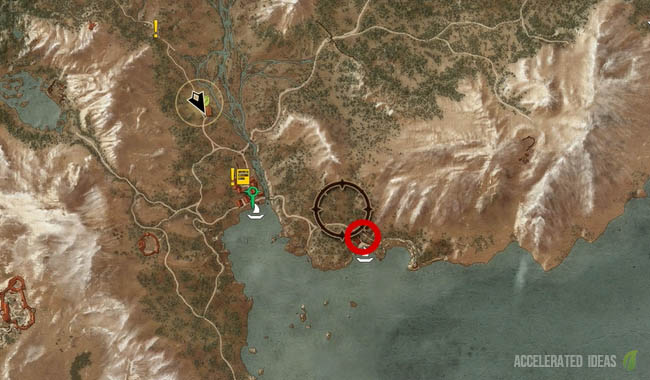
You probably understand by now that the Scavenger Hunt is hidden until you find the first piece of the Witcher Bear School set. In this step you're going to venture to the south of the main Skellige Island to explore a ruin. Hidden just inside this ruin lies the first Bear School diagram for the Ursine Steel Sword.
So let's start with some directions. From the main Island of Skellige scroll right down to the central area where the island splits into two, a longer western shore that goes south and a horizontal eastern shore. We're interested in the eastern shore, shown by a red circle on the map above. The exact location of the ruin is just east of Fyresdal.
2. Fight off the Sirens
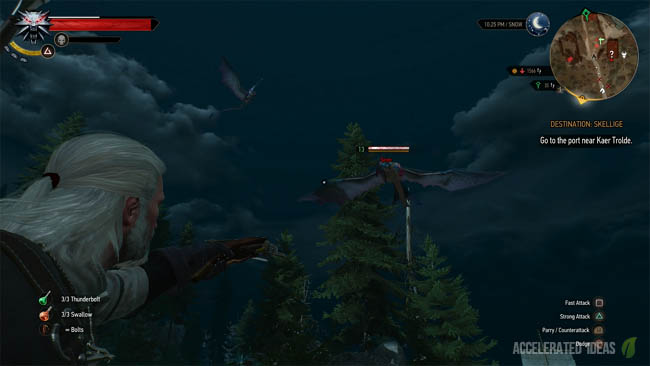
As soon as you arrive in this village you'll be pestered by a group of Sirens. It's your first test so grab the crossbow and force these airborne creatures to hit the ground. As soon as you down one, leap over and inflict the finishing blow to kill it off. Repeat until the threat is gone.
At this point you can go a little further (and I recommend you do). Just to the right of the path lies a Siren Monster Nest which can easily be destroyed. Big mama Siren is going to come after you so be prepared. Rewards for fighting off the beast will include some decent XP and returning inhabitants that include a herbalist with a great inventory.
![Monster nest cleared out]()
3. Explore the ruins and kill the wraiths
![ruin entrance]()
Take the path that leads round to the left and up the hill slightly. Ignore the house of your immediate left, it's the ruins we're interested in here.
Once you've spotted the ruins on your right, head over and select Aard to blast the debri off the ground to reveal a stairway down to the basement. This is where the loot lies but of course there's two really nasty wraiths in the way.
So welcome to the Level 20 monster club because it's time to finish these two off! Start with a quick meditation to replenish your potions, bombs and health. Immediately activate Thunderbolt and stay near the top of the stairs to avoid getting trapped downstairs.
![wraith fight]()
Set a Yrden trap at the bottom of the stairwell and tempt the wraiths into the zone. Follow this immediately by lobbing a bomb and swinging like crazy, before backing off once the wraiths try and counterattack.
Repeat until the jobs done. Then venture downstairs and explore the room at the far end for your first piece of Bear School gear - an Ursine Steel Sword. Read the notes to set the next quest objective.
Rewards- Quest Item: Arrest Warrant for Witcher Gerd
- Quest Item: Innkeep's Notes
- Witcher Gear Diagram: Ursine Steel Sword (1 of 7)
4. Travel north to Fort Etnir
![Fort Etnir map]()
Fort Etnir lies on the same central island as the ruins, but it's much farther north. So far north in fact that it's due east of Kaer Trolde (see map above).
This is my favourite part of the quest and easily the most frightening. Once again prepare for a fight to claim the next part of the Bear School gear which is guarded by not one but two Gargoyles and an Ice Elemental.
The usual tactics apply here: Meditate to replenish health, potions and bombs. Make a quick manual save, activate potions and venture forth. My advice against the Gorgoyles is to keep your finger on the roll button at all times. They fly up into the air and stomp on your head or maybe throw a huge bolder straight at you - both of these require a considerable dodge. The Bestiary recommends that you use the influence Sign but that didn't work for me so my levelled up Igni worked ok.
![Gargoyle fight]()
Attack from behind or the side to increase the attack damage and focus on one monster at a time. Most of all enjoy the fight because it's great.
Once you've cleared out the threat, head through the small door on the right of building and claim the second Bear School weapon - Ursine Silver Sword.
Rewards- Quest Item: Arrest Warrant for Witcher Gerd
- Quest Item: The Knight Chalmir's Letter
- Witcher Gear Diagram: Ursine Silver Sword (2 of 7)
5. Travel to Svorlag, north west island
![Svorlag map]()
This is the easiest part of the entire quest which lies not far from Svorlag on the north western island.
Head straight to the island and work your way to the south coast. A secret cave lies near the sea, directly in the middle of the southern coastline. Explore the cave and head into the small right tunnel which ascends slightly above ground through a steps of climbable walls.
![ledge jump]()
The next part requires only good timing. Give yourself enough space to start running then leap over the gap and grab hold of the ledge on the opposite site. Pull yourself up and the third piece of the Bear School set is lying on the floor by skeletal remains.
It's the Bear School crossbow thus completing the weapon side of the Bear set.
Rewards- Quest Item: Letter to Ingeborga Kalebsdotter
- Witcher Gear Diagram: Ursine Crossbow (3 of 7)
6. Travel to Urialla Harbor, north east Skellige island
![Urialla Harbor map]()
Onto the final part of the Bear School quest to collect the full armour set. Unlike the earlier steps, this part is slightly easier so take a little breather - the hard work is almost done.
Urialla Harbor lies on the north east island of Skellige. Simple Fast Travel to the sign post will get you there easily enough. Then take the anticlockwise circular path leading up to Fort Tuirseach.
![scaling cliff path]()
Near to the fort, the path entrance will be blocked off, leaving you to scale the side of the mountain to gain access. Take a slight left turn and start climbing over the rocks and jump back down on the other side of the blockage. Now walk carefully along the mountain path and jump across the gaps to reach the fort entrance.
7. Explore the Fort
![fort entrance]()
Once inside the fort, take an immediate left and walk down the stairs and follow the long passage until the end. There will be a lever on the wall - pull it to activate the doors granting access to each of the cells and a narrow passage. Beware, several wraiths will spawn in so be ready with the combat tricks you used before to get rid of these creatures.
Retrace your steps slightly and notice the entrance on the left, leading to a narrow passageway. It's quite unlike the other prison cells so easy to distinguish.
![narrow passage entrance]()
Fall down into the passage, and follow the route until the end, where it divides like a hammer head. Expect some more wraiths here so deal with them efficiently. The left passage will take you to a dead end, whilst the right passage leads up into the loot room.
In the loot room you'll find the complete Bear School armour set lying on the floor. Congratulations you now have one of the strongest armour sets in the entire game!
For those eager for the next challenge, there's a convenient lever and door leading back outside to the forts entrance.
Rewards- Witcher Gear Diagram: Ursine Armor (4 of 7)
- Witcher Gear Diagram: Ursine Boots (5 of 7)
- Witcher Gear Diagram: Ursine Gauntlets (6 of 7)
- Witcher Gear Diagram: Ursine Trousers (7 of 7)