Witcher 3 Walkthrough - Cat School Gear Quest
Posted in
witcher 3
In this tutorial you'll find a complete walkthrough for the Cat School Quest - revealing each of the secret locations and each of the monsters you'll need to fight through. This quest is noticeably harder than the previous Griffin quest for the obvious reason that the rewarded gear is much stronger.
As I covered in the previous school quest, completing Treasure Hunts is a great way to earn more valuable diagrams to craft even stronger gear (both weapons and armour) in the Witcher 3. For those new to the Witcher series, Cat school gear is better than both Viper and Griffin. It is only superseded by the Bear school and other Master Armorer quest gear.
Before you attempt this quest, I strongly recommend you complete some of the main quest line first, in particular the Wandering in the Dark quest will give you an item to open the cave entrance, and without this you won't get too far! There's also a decision during the Bloody Baron quest where the Baron will give you a Letter granting unrestricted access to Novigrad.
If you would like to watch the video tutorial then click the link below, otherwise read on for a full step by step guide...
 YouTube tutorial video
Quest Rewards
- Witcher Gear Diagram: Feline Silver Sword
- Witcher Gear Diagram: Feline Steel Sword
- Witcher Gear Diagram: Feline Crossbow
- Witcher Gear Diagram: Feline Armor
- Witcher Gear Diagram: Feline Gauntlets
- Witcher Gear Diagram: Feline Trousers
- Witcher Gear Diagram: Feline Boots
How to start the quest?
Just like the Griffin quest this Treasure Hunt has no starter and players need to find one of the secret items to kick start the quest. To save you a lot of exploring, step 2 below will unlock the Treasure Hunt and add it to your quests list.
Quest Steps
1. Travel to Est Tayiar
If you've just started playing the Witcher 3 then the eastern side of Velen will be completely unexplored. The exact location of Est Tayiar is shown in the image above (see video tutorial for wide angle view) and for reference it's:
- On the far eastern side of Velen
- Across the water, north east of Oxenfurt
- East of Temerian Partisan Hideout
Note: Once you reach the Nifgaardian Connection main quest the Velen map is revealed giving you an important Fast Travel points at Hanged Man's Tree. This is not a bad time to explore the eastern side of the map and reveal a few additional Sign Posts along the way.
2. Explore the ruins and head underground
![ruins]()
Est Tayiar is a relatively small location with just a single point of interest - the ruins. Walk to the center of the temple and head down the stairs leading underground. Use your Aard Sign to break through the concealed entrance on the right and you'll find the first piece of Cat School gear (Feline Silver Sword) on the floor by a dead body.
Congratulations, this now kickstarts the quest and you're on your way…
Rewards- Quest Item: Professor Sigismund Gloger's Notes
- Witcher Gear Diagram: Feline Silver Sword (1 of 7)
3. Travel to Drahim Castle
![Drahim castle map]()
After reading Professor Sigismund Gloger's Notes from the dead body, you'll learn that the next location on this Treasure Hunt is Drahim Castle. The castle lies west of your current location, just south of Novigrad, south west of Cunny of the Goose.
Climb back out of the ruins and head to the Sign Post at Est Tayiar. Then initiate Fast Travel straight to Drahim Castle (or as close as you can get).
4. Explore the Castle
![Drahim castle view]()
Drahim Castle is quite a scenic place and there's another Secondary Quest that starts in this location. That's not something we want for now, so use Aard to blast through the Castle door and use the ladders leading down to the basement.
![loot rewards]()
You'll see the sparkling quest item just in the corner of the basement. This is your second piece of Cat School gear which is a Feline Steel Sword.
Another quest item is included in this loot. It's a journal, that reveals the next location - Kiyan's boat (the Flying Stag). It's lying not far off the coast of the Grassy Knoll.
Rewards- Quest Item: Prince Adrien's journal
- Witcher Gear Diagram: Feline Steel Sword (2 of 7)
5. Travel to the shipwreck
![shipwreck map]()
On the far north western shore of Velen lies a great shipwreck, and a handful of smuggler treasure close by. Call in Roach for a horse ride across the landscape towards the waters edge - shown on the map above.
Dive into the water and swim across to the shipwreck, it's not too far. Climb aboard and walk into the submerged underbelly of the boat where you'll find a chest and another piece of Cat School gear - a Feline Crossbow.
![shipwreck loot location]()
As before, there's also another note providing clues to the next and final location for this Treasure Hunt.
Rewards- Quest Item: Mage's Notes
- Witcher Gear Diagram: Feline Crossbow (3 of 7)
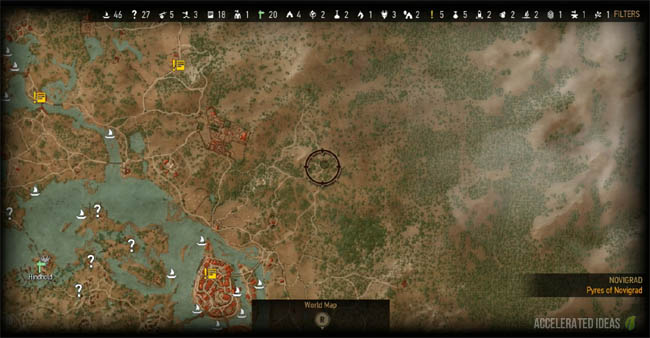
6. Travel to Novigrad
![Novigrad map]()
Our final part of the quest takes us to the city of Novigrad and on to the most rewarding but by far the hardest part of the quest. As mentioned above you'll need the magical item from Keira Metz (Wandering in the Dark quest) to dispel illusions to complete this part, and the letter from the Bloody Baron quest will make getting into Novigrad a lot easier.
The location we're interested in lies to the far north western side of Novigrad, in an area known as Electors Square. Make your way to the western coastline, close to the steep cliffs.
7. Follow the cliffside path
![cliff path entrance]()
This is the hardest location to find in this quest and venturing the wrong way can quickly lead to death. Avoid any attempts to climb down the cliffside or swim round to the secret cave entrance.
Instead, stay close to the edge of the cliff, within the city limits. A path will stray down the side of one of the houses (shown in the image above). Follow this path round the side of the island and down towards the cave entrance.
Use the magic item given by Keira Metz to dispel the illusion blocking the entrance to the cave.
8. Explore the right tunnel
![right tunnel entrance]()
As soon as you enter the cave you'll be greeted by a huge Golem that's guarding the area. He's a level 16 monster, well above the level for most quests in Velen. Needless to say this guy is seriously hard to beat so unless you've got the level to match him and the right gear I would avoid the fight as best you can.
The quest location we're interested in lies on the right of the Golem cave. So as you walked into the cave, look immediately on your right for a blocked entrance. Use Aard to smash through and you've got a new tunnel to explore.
Venture forth, fighting off the wraiths and swimming through the pool until you reach the end of this passage. Notice the sparking item on the floor? Pick up the quest item.
Rewards- Quest Item: Invoice for a Golem
9. Explore the left tunnel
![left tunnel entrance]()
Leave the tunnel, and head back to the Golem cave. There is another winding tunnel to explore, which lies directly opposite the entrance to the tunnel you just explored, or to the left as you first come into the Golem cave. You can't really miss it as there's only two tunnels to explore in this area.
Follow the tunnel round, climbing walls until you reach a new chamber with several statues in a circular formation. This is a new riddle and a rather easy one - just activate each of the switches so the statues all face towards the center.
![statue riddle]()
Correctly completing the riddle will initiate a rumbling sound and the floor will open up, revealing a pool of water.
![pool with loot]()
Dive into the water and get your crossbow ready to take out the annoying Drowners. Then take a deep breath and dive to the bottom to the collect the next quest item - a Key to the laboratory.
Rewards- Quest Item: Laboratory Key
10. Open and explore the laboratory
![laboratory entrance]()
Make your way back out of this tunnel and into the main Golem cave once again. This time we're ready to move onto the final area of the quest and claim the full set of Cat School armour.
So take a left turn as soon as you enter the Golem cave and head up the stairs to the locked door. The Golem will no doubt see you so be quick and roll your way to the locked door as fast as possible.
Use the key and enter the laboratory for the final boss fight of this quest.
11. Boss Fight vs Mad Kiyan
![Mad Kiyan]()
Thankfully the final boss fight for this quest is actually easier than the Golem monster that precedes it. It's a Level 17 witcher, half human, half monster creature that behaves in every way like a human opponent. For this reason I chose to use the Steel Sword and Quen Sign (protective shield).
Then it's a case of dodge, counter attack, roll back. Repeat.
In addition to the counter attacks, use Quen to provide a shield advantage and if you've got the Thunderlord potion then that will help multiply your damage attacks. Remember to keep enough space for your dodge and avoid getting trapped in the corner.
12. Collect the full Cat School armour set
![Mad Kiyan loot]()
Once the boss is dead, loot the body and claim the rewards from this quest. They come in the form of a full set of Cat School armour - chest, gauntlets, trousers, boots. In addition to the quest gear there's also some valuable loot in this area so clean up!
Rewards- Witcher Gear Diagram: Feline Trousers (4 of 7)
- Witcher Gear Diagram: Feline Gauntlets (5 of 7)
- Witcher Gear Diagram: Feline Boots (6 of 7)
- Witcher Gear Diagram: Feline Armor (7 of 7)
Congratulations you now have a full set of Griffin Armour and Swords which you can craft from a trusty Armorer and Blacksmith. This gear is noticeably stronger than Griffin gear and will set you up well for the Skellige Islands.