God of War - All Muspelheim Cipher Map Locations
Posted in
god of war
The Muspelheim Cipher's are important collectible items in God of War that not only open the Muspelheim realm but also unlock some the games best armour sets. In this guide you'll find a complete walkthrough for all of the Muspelheim Ciphers along with map locations to make finding them even easier.
This guide does contain some minor spoilers but you should already have reached this part of the game to be looking for the ciphers in the first place. It's worth noting that God of War doesn't just hand you a set of markers to find each of the ciphers. Instead, it's up to the player to search for and collect each of the ciphers, with 4 needed to unlock the new Realm. Every Cipher is found inside a Cipher chest, which are clearly distinguishable via their glowing orange colour and skull on the front.
Upon collecting the first cipher, the notification pops up saying:
"The Realm of Fire - Unlock the Realm of Muspelheim", followed by a second notification saying "Muspelheim Ciphers Found 1 of 4".
Ok let's get down to business...1. Forgotten Caverns

A very easy Cipher to find but
you won't be able to get this one until the water has receded for a second time and revealed the Forgotten Caverns. Wait until the story takes you to this point.
Once the water has receded a second time, head north of Tyr's Temple using your boat and dock at the shore of the caverns. Head slightly to your right and look for the gold chain dangling from the ledge. Climb up and the Muspelheim Cipher is to your left inside the glowing chest with the skull on the front.
2. Cliffs of the Raven
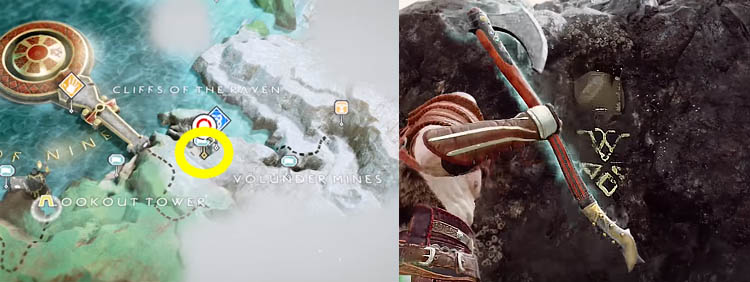
South east of Tyr's Temple is the Cliffs of the Raven. Look for the dead giant lying on the floor in this area and you'll know it's the right place. Navigate round the back of the giant and check the cliff wall for yellow runic symbols and a square wooden barrier that looks breakable. See the right hand side of the image above for details.
Using Kratos' axe, smash the square barrier to reveal a hole. Instruct Atreus to climb up and through the narrow hole. He should eventually throw down a gold chain, allowing you to climb the cliff edge. Climb up and the chest with the next Cipher is inside.
3. Lake of the Nine / Foothills
![Foothills cipher location]()
During the main story you'll head towards the snowy mountain, passing through a ruined tower from Tyr's Temple. Remember the first time you encountered those green poisonous gas clouds and had to use your axe to freeze the disepeners? Well, this is the location of the next Cipher.
As you head through the tunnels, dealing with each of the poisonous gas clouds you'll eventually come to a chasm where you can drop down. There is a small light hole in the ceiling here and a wooden ladder on the right to climb up. At the bottom of the gorge there's another poisonous gas cloud and the all important Cipher chest to the left.
Do as you have done before: freeze the dispenser, deal with the Tatzelwurm (lizard) and claim the Cipher from the chest.
4. Witch's Cave
![Witch's Cave cipher location]()
You'll actually pass this chest without even realizing it during your first encounter with the Witch. Remember that swirling red ball in the cave, nestled in a bunch of vines on the red wall? Well, that's the hidden area for this Cipher. Unfortunately you
won't be able to get past this red door until you've acquired Shock Arrows from the Alfheim region during the main story.
Once you've unlocked this Atreus ability, head back to the Witch's cave using the boat tunnel entrance from the Lake of Nine. Dock the boat inside the cave and the red ball should be right in front of you. See right hand side of image above.
Get Atreus to fire his bow at the red ball and the secret area opens up. Head inside and take the elevator up. Once up stairs, look immediately to your right for another swirling red ball. Use Atreus again to break open the entrance and head inside. Eventually you'll reach a blue swirling ball and the chest.
5. Mountain Summit
![Mountain Summit Cipher location]()
After meeting Mimir, head down the steps that lead towards the Mystic Gateway, just past here is the chest. If you get stuck, study the image above and head through the passage where the arrow is pointing, the chest is on your right.
There are a couple of other Ciphers in the game but considering you only need 4, the list of 5 above is ample to avoid spoiling any of the later story.