The Darkest Shore - All Easter Egg Steps
Posted in
cod ww2
Welcome to the complete step by step guide for The Darkest Shore Easter Egg, the first DLC zombies map for COD WW2. This walkthrough contains all necessary steps for the hardcore EE called "Making History". As always, in depth explanations, puzzle solutions, screenshots and anything essential will be included.
New readers please be aware: Easter Egg guides are active posts on this site, constantly updated, edited and improved as new parts of the EE puzzle are discovered or refined.
As we all know, The Darkest Shore takes players away from the well known streets and underground tunnels of The Third Reich and casts them to a remote island in the North Sea. Surrounded by naval warfare, air bombardment and of course inhabited by hordes of zombies!, players are once again tasked with tracking down Dr Straub. The hardcore Easter Egg ultimately ends with the crew escaping the island and you earning the elusive "Making History" achievement.
Achievements
There are two major achievements for The Darkest Shore Easter Egg, both pertain to hardcore since there is no real casual side this time.
- "Black Winds to Darker Lands" - concludes the majority of the EE and rewards players with the pommel Wonder Weapon, part of Barbarossa's Sword.
- "Making History" - earned by successfully completing the BOSS fight and escaping the island before the bombing starts. This hardcore EE achievement ends with a secret cutscene.
Notebook
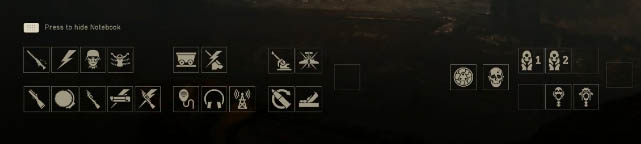
As before, the players notebook contains important information regarding Easter Egg progression. Collectible items and critical tasks are shown in the inventory, helping the player understand whether parts of a Wonder Weapon have been found or whether an important milestone has been reached. The left side of the inventory is designed to hold basic quest items whilst the right is primarily the ritual parts.
For the Darkest Shore, the left side of the inventory has 19 items, such as the minecart, power milestone and parts for the Ripsaw Wonder Weapon. Whilst the right hand side has 9 items, including the charged zombie spines and Son tablets/idols.
It's quite clear that the Darkest Shore has a larger inventory screen compared to The Third Reich which preceded it. This is not however a reason to assume it will be longer or more difficult, in fact according to the unlockable character requirements, it's possible to complete this casual EE in under 35 mins and before round 13.
Is this EE possible solo? So far we have no evidence that the EE is not possible solo and in fact one of the unlockable characters strongly hints that the entire EE is soloable. Check the Bloodraven Survivalist's challenges and you'll see that a player can earn the pommel and even escape solo.
Charged Spine ExplainedOne common and important step in the Easter Egg involves collecting charged spines. This is achieved by using the charged melee attack of the Ripsaw: HOLD L2 then press R2 in front of a zombie. Hold square while you're executing and you collect the spine.
If done correctly, a short animation shows the spine of the zombie following the melee kill. In some cases (50%) the spine will be charged i.e. it has a bright light inside it. When a spine is charged, a little spine meter appears at the bottom of the screen, lasting for a short duration:

Take time to practice this procedure as it's an essential part to completing the Easter Egg.
All Easter Egg Steps
1. Turn on power
![Power switch]()
There are two switches required to turn on power. Both are very easy to find early in the game.
- Inside the submarine pen
- Inside the artillery bunker
2. Ride all the minecarts and open Pack-a-Punch
Use the minecart to ride to each of the possible destinations, one by one. During each journey, look carefully on the floor and interact with the fuse to pick up an "Elektroschnalle". All journeys are:
- Beach (Strand) to Submarine Pen (U-Boat Hohle)
- Submarine Pen to Bunker 1 (Graben)
- Bunker 1 (Graben) to Beach (Strand)
Take the fuses and insert into the machine near Bunker 3 to repair the elevator. A PaP machine will rise from the elevator and is now available to use. Although not technically part of the EE, the improved firepower and ammo count from the PaP, always comes in handy for the higher rounds.
3. Build & upgrade Saw weapon
The Ripsaw Wonder Weapon is initially built from 2 parts, they're located at:
- Handle - on a desk in Artillery Bunker, beside armour station
- Blade - on a corpse in Bunker 3 near MP40 wall weapon
Construct the Saw weapon at the crafting bench in the tunnel not far from the submarine pen. It costs 2500 points to buy.
Once you have the base weapon, start the upgrade process: use an overpowered execution kill with the saw and you'll hopefully earn a zombie spine (with a fuse in it). Place the fuse in the saw crafting bench, then collect zombie souls by killing zombies in the close vicinity. Eventually the upgraded Ripsaw will be ready to buy for 500 points.
4. Open the ancient door
![Ancient door]()
There's a secret door inside the minecart tunnels. Take the minecart tracks and pay careful attention to the large ammunition shell on the floor. Shoot a bomber zombie (or throw a grenade) nearby to explode the obstruction to the ancient door. The minecart immediately leaves the track and you're inside the secret room. You can revisit this room anytime by simply retaking the minecart and leaving the cart at this point in the tunnel.
You've now completed the first step of the Hardcore Easter Egg, a circular item appears on the right of your inventory screen.
5. Get the corpse head and return to the human body in submarine pen
![Hanging body and corpse head inventory part]()
Go to the upper level of the map where the PaP machine is located. Take note of the upside down body hanging above the cliff side. Use the Ripsaw projectile to shoot down the corpse head, then pick it up. Return to the submarine pen and place the head onto the body hanging from the wall.
Now get zombie kills close to the batteries to fill them with souls. Eventually, a lockdown takes place and you must survive whilst turning off the gas pipes to prevent the fire spreading.
Tip: Wait for the fire to stop before using the gas valves. Successfully turning off all three gas pipes will release the lockdown, open the small freezer room and release a flamethrower zombie.
Take note of this new little room called the Freezer as you'll be returning alot.
A new Staub audio quote begins, explaining that the Stuka bombers are now on their way to the island.
6. Shoot down the Stuka bombers with AA gun
![Using AA gun]()
Quickly head outside again and take a seat at an AA gun. Shoot down the dive bomber planes (x 10 approx) as quickly as possible. Don't wait too long before doing this step as the Stuka's become a real hazard if left too long.
7. Find the Monks Head
![Find Monk Head]()
Return to the ancient room and pick up the Monk's Head from the floor. Place the Monk head inside the freezer room, inside the submarine pen.
8. Charge the cannon
Use the machine in the Freezer (via submarine pen) and escort the bomber zombie up to the cannon. Get zombie kills near the cannon to charge the battery for the first time.
We'll return to this step a little later so once the battery is charged you can move on.
9. Build the radio
![Radio part location and table]()
There are two parts for the radio. Locations are:
- On the floor, outside of a bunker entrance near Stamin-up.
- On the pilots body hanging from the cliff edge not far from bunker 3 entrance (burning Stuka wreckage, see left side of image above). Use Ripsaw to shoot off the arm.
Build the radio outside of Bunker 2 on the table.
10. Destroy the German destroyer ship using the cannon
![Naval map and cannon calibration]()
Return to the cannon area again, ships should have spawned into the sea now.
Study the naval map on the wall to calculate the position and distance to the destroyer ship you see in the distance. Take note of the rock positions on the map then use the table underneath the map to calculate the approximate distance. The left hand column of the table gives you an idea of the elevation to set, whilst the actual map tells you the direction to point in.
Use the two machines either side of the cannon to calibrate the gun and when ready interact with the cannon to fire. A good tip is to stand in front and underneath the cannon, looking straight down the barrel and out to sea. This will help you judge whether the angle is just right! It's not an easy step so continuing getting zombie kills if you miss, reload and try again. There may be a couple of ships to destroy so keep going until the quest confirmation appears.
11. Find a Son of Nerthus (1)
![Found a Son of Nerthus]()
Go to the cliff edge (above the beach) where the Flak Cannon is, pay 750 points and use the gun to shoot the grass/rock in front. Objects should break off the cliff and fall down to the beach area below.
Collect the stone tablet/idol from the beach - it usually rests near the cage with fish in it. Carry the tablet to the ancient room that you opened via the minecart earlier. Place the tablet into one of the three holes in the wall.
12. Find a Son of Nerthus (2)
![Son of Nerthus]()
Use the charged melee attack with the Ripsaw to collect a
red zombie spine. Return the spine to the bowl of skulls in the Freezer. A special zombie is winched up the chain and he dashes for the beach.
This guy looks like a regular soldier, with hat and equipment on his back. Follow him as he dashes to the bloody sea water of the beach, disappears underwater and then returns. Now pick up the tablet/idol from the beach area.
Return to the ancient room and insert the idol into the wall.
13. Find a Son of Nerthus (3)
![Mossy cliff edge]()
This is the hardest Son to find because it can appear in 7 or 8 different places.
Work your way around the outside cliffs of the map, using the Ripsaw projectile to shoot what appear to be birds nests. They will explode, moving the idol to the next location, eventually one of which will drop the Son.
Here is an example: take the right hand pathway leading away from the beach, follow the route up and eventually outside to the cliff edge. Stand just outside of the tunnel entrance where the wheelbarrow is and shoot at the mossy cliff edge using the Ripsaw, aiming just below the wooden beams.
At some stage, the third tablet/idol will fall off for you to collect from the floor. Take it to the ancient room and interact with the rolling stone door. It should open to reveal the ritual chamber.
14. Sacrifice a pest zombie
![Special pest zombie]()
Using a charged Ripsaw melee kill, collect a
yellow coloured spine. Return to the small freezer room where you summoned the bomber zombies in the submarine pen. Interact with the bowl of skulls on the floor and a pest zombie spawns in with a coloured ring around him and the word Sacrifice above his head.
Use Ripsaw projectiles to shoot the coloured fuse panels (shown on left side of image above) and rebound a shot into the path of the zombie, sometimes deflecting a shot off several fuse machines in one go. It's important to match the final fuse box colour with the pest zombies colour. If hit correctly, he should change colour.
Note: You must explode the panels off the fuse boxes using grenades first. There are many panels on the map.
When the pest changes colour, he moves to another location where the next set of fuse boxes are. Repeat this process several times. The exact order and necessary rebounds are shown below:
- Teal fuse box at the back of the submarine pen
- Yellow fuse box in the Ripsaw hallway, rebounding onto purple fuse then the zombie.
- Teal fuse box on the cliff (between Bunker 3 and Bluffs), rebounding onto yellow fuse in Ripsaw hallway, then the zombie.
- Yellow fuse box (in Artillery Bunker above M1941 wallbuy), rebounding off the other two fuse boxes, then zombie.
- Yellow fuse box (submarine pen), rebounding off purple fuse box, then zombie.
Finally, return to the Nerthus Sacrificial Chamber (via ancient room) and the rolling stone door should lock behind you. Locate the friendly pest zombie (with glowing light) and kill him. Pick up the "Anointed Pest Head" and place it on the hook hanging from the ceiling.
15. Sacrifice the Wustling zombie
![Wustling zombie taking perk]()
Get a
Wustling zombie spine (zombie with the clubbed arm) using the Ripsaw and place it in the bowl of skulls.
A friendly brute zombie spawns in with the word Sacrifice above his head. Lead this brute to several perk machines on the map. Be warned, this step is extremely buggy and the brute gets stuck
unless you follow an exact sequence.
The order of perks you must lead the zombie to are:
- Kugelblitz (aka Double Tap)
- Faustblitz (aka melee, Artillery Bunker)
- Laufenblitz (aka Stamin-Up)
- Lebenblitz (quick revive)
Important: The Wustling will try to take Laufenblitz (stamin-up) before Faustblitz (melee). Make sure you shoot him to avoid the bug and take that perk later.
If done correctly the Wustling will jump into a hole in the wall after collecting the last perk. You can now return to the Nerthus Sacrificial Chamber (via ancient room) and kill the friendly Wustling then hang the "Anointed Wustling Head" onto the hook.
16. Sacrifice the Meuchler zombie
Use a charged Ripsaw melee kill to get a Meuchler spine (tenticle/spider zombie) and place it in the bowl in the freezer.
A Meuchler spawns in and immediately goes to hide. Find the friendly Meuchler 3 times in the fog and melee him. He moves each time you do this. Use the scream noises to locate where the Meuchler is in the thick fog. Watch out as several enemy Meuchler will spawn and you must kill them to protect the friendly one.
After the third time the Meuchler disappears and it's time to go back to the ancient room. As before, kill the friendly Meuchler there and hang his head on a hook.
17. Hang the monks head
![Pommel quest complete notification]()
Return to the freezer, pick up the monks head and take it to the ancient room. Hang the head onto the remaining hook. The door will lock and it's time to fight off the zombies to survive.
After the waves of zombies are killed, Barbarossa's pommel will be in the hand of the Netharus statue. Pick it up and it goes into the monkey bomb slot of the inventory.
18. Use the radio
This is now your last chance to stock up on weapons, ammo and anything else before the BOSS fight.
When ready, throw the pommel at the radio you built and used earlier in the game. Have all players interact with the radio to be taken to the final BOSS fight.
19. BOSS fight
The BOSS fight is fairly straight forward and consists of four phases: Beach, Submarine Pen, Bunkers, Beach.
During each phase there are a number of Super Meuchlers and the usual zombies. You'll know it's time to move onto the next phase when the minecart can be used again. At the final beach phase, you'll deal enough damage to the Super Meuchlers to kill them off once and for all.
The ending cutscene plays once the Super Meuchlers are dead.
The Easter Egg is now complete and the guide has been edited and revised to improve readability. Minor changes may occur in the future but otherwise it's got everything you need. Enjoy!