The Tortured Path Zombies - All Easter Egg Steps
Posted in
cod ww2
Welcome to the comprehensive Easter Egg guide for "The Tortured Path" zombies map, part of the DLC 3 collection for Call of Duty WW2. This guide will contain step by step instructions, helpful screenshots and puzzle solutions for completing the main EE that concludes with a secret achievement and cutscene.
As with all our other EE guides, this is a constantly evolving document that's updated in real time as new steps are discovered. Towards the end of the hunt, steps will be refined and corrected to provide a concise walkthrough from start to finish. Throughout the experience, I will endeavor to let you know whether this EE is possible SOLO or if you need teammates to guide you through.
SOLO status: This EE is very difficult SOLO, almost impossible. Ideally you'll need a team to help with the difficult windmill lightning step and the sacrificial pads towards the end.

Die hard fans will know that COD WW2 hasn't been the most popular zombies mode in recent times and this DLC was barely promoted by Activision. With a diminished number of players participating in the hunt, EE steps may prove more difficult to solve and hence expect a longer than usual experience.
We know from the early gameplay sessions that the Tortured Path has really altered the zombies formula. Armour machines have been removed. Wall buys are random rolls within a particular class e.g. machine gun, sniper etc. Ammo can be purchased from crates rather than through the wall buys and the well known mystery box is also permanently gone. Many of these changes are pretty big risks for Sledgehammer so only time will tell if they pay off or not.
Trophies/Achievements
![Sword of Barbarossa]()
We know from the leaked trophy list that the main Easter Egg is called "I Have the Power" which is earned from constructing the final version of Barbarossa's sword. A final BOSS fight takes place against the "Guardian" and the map itself is spread across three individual areas. Referred to as "maps", these areas must be completed by solving their associated puzzle/challenges, at which point the team can progress forward to the next area. For each of the areas you progress through, an associated trophy is earned e.g. "Beneath the Ice", "Across the Depth" and "Into the Storm".
How to unlock Pack-a-Punch
Starting from round 1 and then after each objective round there will be a battery available somewhere on the map. Kill zombies in close vicinity to charge these batteries. Successfully charging three batteries will automatically activate the Pack-a-Punch machine (this is only possible after round 7).
Into the Storm - Battery locations - Outside the windmill next to the Assault Rifle wall weapon
- Outside the cracked house near Self Revive machine
- In the basement of the house
Across the Depths - Battery locations - Near PaP machine
- Behind Spawn in the lower deck of the boat
- Projector Room near the doorway
Beneath the Ice - Battery locations - Near the Schnellblitz perk machine
- Near the Laufenblitz perk machine
- Near the PaP Machine
BOSS Fights Guide
Each of the three maps has a BOSS fight at round 11. The BOSS must be defeated before you can progress on to the next area. There is also a timer during the fight so be quick and don’t linger! Although the fights themselves do not directly correspond to the EE - you still need to know how to progress.
Into the Storm - Super Brenner (Flame Thrower)The Brenner spawns into the map in an invincible state. Look on the ground for a small glowing red circle. Make sure you and the Super Brenner are both inside the circle so that the missiles hit the BOSS. This should bring down his shield and stun him, ready for you to unleash your strongest weapon against him. Repeat this process, moving the BOSS to the airstrike locations and dealing damage.
Across the Depths - Super SteinjagerThere is a certain timing window to killing this BOSS. Wait until he shoots out a few grenades from his arms then go all out with your strongest weapon and deal damage, Repeat.
Beneath the Ice - The GuardianThe final BOSS of The Tortured Path map is a brand new edition to this zombies mode. Wait until the Guardian moves to the blood sacrifice room, then simply shoot the statues above his head that are glowing. This stops him from healing and stuns him momentarily. At this point, go all in with your best weapon. A good choice of weapon is the upgraded Hurricane version of the Tesla Wonder Weapon.
All Easter Egg Steps
Into the Storm
1. Collect the body partsThere are six body parts that players can collect in the village map: 2 x arm, 2 x leg, a body and a head. The spawn locations for these parts are random every game but common hiding places include the fireplace, bush, on a fence etc.
Some of the possible locations are listed below, but it’s worth noting that the list of possible spawn points appears to be quite large:
- Arm 1 - Underneath the wooden stairs, in the wine cellar (basement) near the red perk machine
- Arm 2 - Fireplace
- Arm 3 - Outside the house with the wooden door, to the left on a plant pot
- Arm 4 - Inside the house with curtains and grandfather clock. In the corner, on the table by gramophone.
- Arm 5 - on the floor near the outside radio
- Arm 6 - inside the windmill, near wooden ladder and perk machine
- Arm 7 - inside the building with the fireplace, on the large stack of debris
- Arm 8 - on top of the log pile behind the house
- Arm 9 - unlit fireplace beside SMG wallbuy
- Leg 1 - Near the red perk machine in the cellar, inside a shelf on the wall
- Leg 2 - Outside the house with the wooden door, in a hanging plant pot
- Leg 3 - On the front tyre of the truck next to the APC/tank
- Leg 4 - on the floor beside a knee-high fence, edge/boundary of the map near the river
- Leg 5 - on the floor, inside the building with the barrel and wooden ladder
- Leg 6 - up above, on the ceiling of the building with the smashed in roof, wooden door and blue windows
- Leg 7 - edge/boundary of the map near river, on knee-high fence beside apple box
- Leg 8 - hole in wall to the left of Schildblitz perk machine
- Leg 9 - to the right of Schildblitz perk machine
- Head 1 - Near Lebenblitz
- Head 2 - behind the windmill near river, edge of the map on a fence
- Head 3 - Inside the crumbling/smouldering house with the blue window, on the floor near the clock face
- Body 1 - Outside on top of the upside down wooden cart
- Body 2 - At the back of the building with many blue windows, on the wall
- Body 3 - On the window above PaP machine
- Body 4 - Fireplace in the house with the wine cellar
2. Find the rope![Rope dangling from tree]()
Collect the rope from behind the windmill in the creek area. It's dandling from a tree, just outside of the map near the river (see image above). Shoot the rope with any weapon and it'll fall into the water and float away, wait a few minutes and collect the rope a little downstream. Hold down the controller button when you do this to make the tree rise and the rope appear.
3. Find the metal rodsOnce you have all the zombie parts a drop pod appears in spawn. Collect two metal rods from it.
4. Winch the zombie up the windmill![Zombie on windmill]()
Now collect a Wustling arm (by killing that particular zombie) and place it into the windmill cogs to stop the windmill from turning. The key is to stop the windmill when the larger blade is at the bottom.
Place all of the zombie body parts you found onto the large windmill blade, together with the metal rods and the rope. Now remove the Wustling arm to start the windmill turning again.
The next challenge is to allow the windmill to turn enough so that the blade with the zombie on is at it's highest peak i.e. 12 o'clock. Then pull out the arm to stop the windmill in this position. This is a very tricky step to accomplish so use a friend outside to help you spot when the blade is at 12 o'olock. Now wait for the round to end and the zombie will be struck by lightning and fall to the floor.
5. Charge the zombieThis fallen zombie acts as a soul box now so simply kill zombies nearby to charge it. Eventually the zombie awakens and walks around the map before falling into a small hole. Wait another round and the zombie reappears with a battery in his hand, walking towards the cellar. Get zombie kills in close proximity once again to charge the zombie.
6. Collect the HiltEventually when the zombie is charged enough he drops the battery. Pick it up and use it to open the nearby door. The Hilt reward is inside. You now have the first piece of Barbarossa's sword!
It's now safe to escape the map by reaching round 10 and defeating the BOSS.
Across the Depths
7. Melee the UberschnalleInside the boats hull where the Pack-a-Punch machine is, look for the Uberschnalle in the corner of the room. It's near the trash can and table. Melee the Uberschnalle to change your FOV and the screen will fade in and out briefly.
A strange red mist will appear in the corners of the screen to signify that you have done this correctly.
8. Shoot the fishProgress to the next round and look for the flapping fish. Shoot these fish while zombies appear and disappear from view. It's important that you shoot EVERY fish to complete this step of the EE - approx 9 in total.
9. Feed the fish![Fish above Uberschnalle]()
More Uberschnalle's will spawn in around the map now. Look for one of these devices (e.g. 3000 Jolt wall buy in the lower deck) and carry it to one of the Uberschnalle stations with a floating fish above. Place the device in the station and get kills within the vicinity of the Uberschnalle. Eventually when you have defended for long enough, the fish swims off to the next station. Repeat the process for each of the stations.
10. Find StraubAfter completing the fish step above you'll be teleported to a completely new location, away from the ship. The task now is to find the apparition of Straub i.e. ghostly image. Once found, watch the little animation and get ready for a tough fight.
11. Complete the fish and bucket challenge![Fish bucket challenge]()
Remember that game you played as a kid where a ball was hidden under one of three cups and someone moved them very quickly before you had to guess where the ball ended up? Well, it's time to play that game in COD zombies but this time there is a fish under the bucket rather than a ball and there's alot more buckets!

Complete three steps of this game and you'll be rewarded with the Pommel object, a piece of Barbarossa's sword.
It's now safe to escape the map by reaching round 10 and defeating the BOSS.
Beneath the Ice
12. Melee the UberschnalleA similar step to earlier, we now need to find another Uberschnalle to get the special FOV. The Uberschnalle in question is located in the central chamber. Melee it three times to activate the FOV, giving you the chance to find Klaus.
The special mode lasts for only a short time but can be reactivated by interacting with the Uberschnalle again.
13. Solve the runic symbol puzzleOn the door beside the AR wallbuy (back of the map) there are a series of runic buttons believed to be Thulian language. The key to solving this puzzle is to interact with the buttons on the door to spell a particular word.
The actual symbols you need to press are determined by the symbols you can find around the map. These symbols will be bunched together (e.g. 5 symbols) in a single location. It's a good idea to use a Sniper Rifle to zoom into the symbols to read them clearly.
Possible symbol locations so far are:
- Above the door, next to the shotgun wall weapon
- Behind the scaffolding, left of the entrance door to ritual room
- Under a statue in the ritual chamber
- In the hallway by blitz, up high on the ridge
- On a slab behind the Schildblitz perk machine
- Right hand side of the vase at the back of the map, near pressure plate
Example symbol location:![Runic symbol location]()
Once you've entered the correct symbols a mini-earthquake will occur, allowing you to now place the Hilt (from chapter 1) into the glowing forge area. It should glow and can be picked up at the end of the round.
Possible Rune combinations (Cheatsheet)Below is a list of possible rune combinations. Use the image and sequence list if you prefer not to look around the map for the runes.
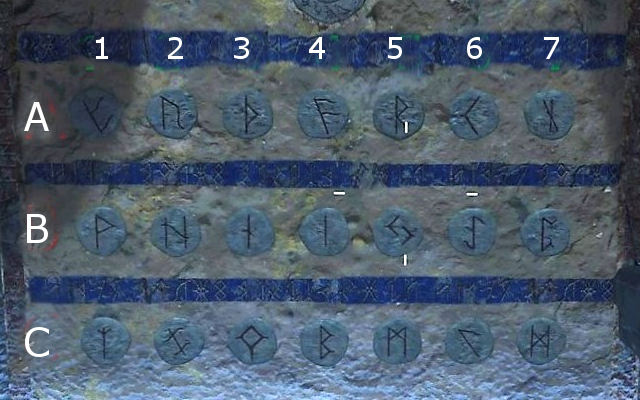
- A2 B5 B3 C1 A1
- A2 B5 B3 C1
- A2 C1 B3 B7 B5 A5
- A2 C1 B3 B7 B5
- A4 C5 A1 A7 B6 B7 A7
- A4 C5 A7 B6 B7 A7
- A4 B5 A1 A7 B6 B7
- B2 C2 A7 C4 C5
- B2 C2 C3 A2 A7 A6
- B2 C2 C5 A2 A7 A6
- B2 C4 A2
- C1 A3 B2 B3 C2 B2
- C5 A2 A5 A3 B6 A6
- C5 A5 B6 A4
- C5 B4 A6 A5
- C5 C6 B3 C4 A2 C1 B5
14. Use the flaresHead to the stairs leading to the ritual room and pick up the flares - these replace your special grenades.
In the statue room throw the flares into the fire pits on the walls underneath the head statues. This will light the flares ready for you to use.
Throw the flares into the three ember bowls:
- Left of Laufenblitz
- Left side of the Rune door
- Right side of the Rune door
If done correctly a door will open by Laufenblitz - now pick up the second Rune.
15. Enter the second runic codeTake the second Rune and place it onto the door.
Now it's time to enter a second code on the secret door. Using the same principle as before, find the new set of runic symbols around the map and enter them using the buttons on the door.
At the end of the round the Pommel will drop - place it into the Altar in the central chamber.
16. Sacrificial padsAround the map there are several pads that light up when players stand on them. Stand on the pads and get enough kills until the step is complete. Approx 2-3 mins.
Repeat the runic symbols step again: looking for a new set of symbols and entering them on the special door. At the end of the round the Blade will drop, allowing you to build the final Barbarroa sword.
17. Escape the mapNow it's simply a case of beating the final Guardian BOSS and escaping the map with the sword.
Ending cutscene![Final ending cutscene]()
If you've completed all of the steps above then you'll now see the final cutscene. Congratulations!
The EE hunt is complete! This guide will be edited and refined for improvements.