The Final Reich WW2 Zombies - All Quest Steps
Posted in
cod ww2
The Final Reich zombies map contains nine quests that players can follow and complete as they work their way towards the final BOSS fight. These quests help to unlock new areas of the map, build a Wonder Weapon and ultimately unlock the first ending cutscene. Completing all of the quests results in the Fireworks achievement/trophy.
This is the first time in zombies history that we've had this level of guidance within the game. Typically players are left to their own means to discover new areas and in particular claiming the Wonder Weapon. Sledgehammer have broken that trend in WW2 zombies.
Every quest is comprised of several objectives - little tasks that must be completed to move on to the next objective. Once all of a quests objectives are complete, a new quest line pops up and you move on. This is NOT like a typical RPG or anything clever - there are no NPC's or difficulty in progressing from one quest to the next.
At certain objectives during a quest, players receive a quest item or part. These appear in the inventory screen on the
left hand side. Each group of parts relates directly to a quest line and a quest is only complete once all parts are found.
Players should note: quest parts cannot JUST be found like in Treyarch zombies. You MUST complete the quests in order to earn them.
Ok, here's a detailed run through of all of the quests leading up to the final BOSS and the first ending cutscene. For your viewing pleasure I have also included an index, allowing you to jump straight to a particular quest.
Quest IndexAll Quests
The Sewer
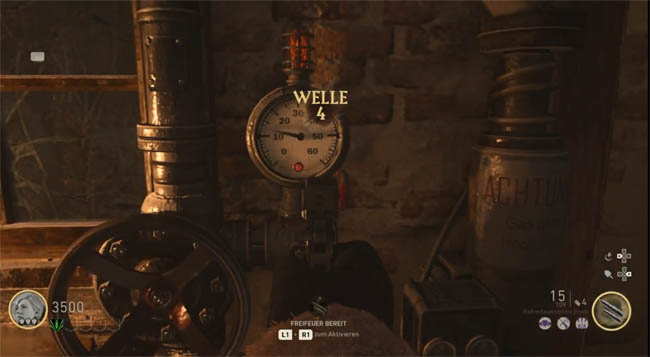 Find the gas units
There are three gas units (machines) that you need to find and interact with to increase the gas pressure. Find these three machines (image shown above) and turn the valves to increase the pressure in the pipes until the meter reaches 60. The light will turn green and your character says an audio quote.
If you have difficulty finding the gas units, there's a larger machine in the open area where the sewer gates are. It has three lights and pipes leading away from it - follow the pipes to each of the three gas units.
Locations:
- Pressure Valve #1 – Left of the Armor Station
- Pressure Valve #2 – Left of the Bunker Door
- Pressure Valve #3 – Near the Riverside just down the slope
Activate the pilot lightWhen all three units are green, return to the open area with the sewer gate and approach the machine beside the sewer gate. Interact to press the red button and activate the pilot light. A fiery explosion occurs, blowing the gate off the sewer entrance
The Bunker
 Restore power to the bunker door
Simply hop down into the sewer, follow the path onwards until you see a machine to your left. Interact to turn on the green light and the objective changes.
Open bunker doorMake your way back outside and go to the huge metal bunker door. Pay the price to open the door and this objective is now complete.
Find power supply for salt mines door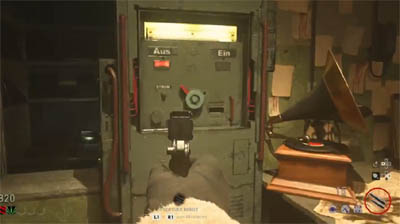
Venture into the bunker and eventually you arrive at a large Command Room with a pyramid shaped machine on the floor. Walk up and turn the crank to open the top of the pyramid. Next, locate the smaller room (in the Mortuary) with the gramophone and the machine that has an on/off switch. Turn the switch to the ON position to complete this objective.
Find the second power supply for salt mines doorThe second control panel is through the Laboratory entrance. Go through the metal tunnel and into the smaller room on the left. It takes a little bit of exploring but the machine is exactly like the first example above. Once the switch is activated you can buy your way into the salt mines for 1500 points.
The Emperors Chamber
 Explore the salt mine
Simply make your way through the mine to the larger chamber.
Activate the geistkraft (brain) transmitterInside the large chamber there are three smaller pillars (devices) and a larger device directly in front of the knight statue. Simply interact with the large device and then get zombie kills in close vicinity. As you kill each zombie, a red glow will charge the machine in front of the statue. Repeat until objective complete.
The Weaponsmith
![Command Room inside Bunker]() Start the weapons assembly process in Command Room
Start the weapons assembly process in Command RoomHead back to the Command Room where you interacted with the pyramid shaped machine and opened its top. Directly opposite the pyramid there is an upper platform where another machine is located. Go to this upper level by following the stairs around the side then flick the switch on the machine (shown in image above).
Escort the power transmission deviceOn the ceiling above there's a small device that moves on rails. On the floor there's a red circular area. Stay within the circle area, following the device whilst killing zombies to power the transmission device. The device will stop periodically when it runsout of power - kill more zombies to charge it up.
Pick up the Tesla CannonEventually the device will reach a large circular machine with spinning plates. The objective changes to pick up the Tesla weapon - simply wait until it appears in front of the machine and claim it for yourself. Completing this step adds the second part of the Weapon Assembly quest to your inventory. Be very careful during this step as three larger brutes will break free from their chambers - they have spiked clubs on their arms and although slow moving they are very powerful when charging.
Escort the power transmission deviceTime to repeat the escort step again. Remember, stay close to the red circle and gradually get kills to keep the device moving along the rail. Eventually the device arrives at it's destination, wait a second for the giant vat to clear and a new quest item pops out of the front of the cylinder.
![Command Room]()
One final step to go. Keep escorting the transmission device until it goes all the way back to the Command Room, just opposite the pyramid device you opened earlier. Be careful here as a flamethrower zombie spawns into the area. Kill him off and wait patiently until the Tesla Wonder Weapon is available from the workbench in the middle of the room.
An onscreen message will appear saying "Tesla cannon constructed".
Important: You can pick up the zombie flamethrowers head, carry it around and use it to scan objects (such as paintings) later during the Voice of God quest.
The Right Hand of God
![The Right Hand of God]() Examine the Right Hand of God
Examine the Right Hand of GodGo back to the chamber with the statue inside, where you earlier killed zombies to start the transmission device moving. Interact with the pillar on the left of the three - the one with the large hand
Route energy to the tower / Activate the Power Grid![Command Room machine]()
Go to the Command Room, upper level. Interact with the machine that is has four switches numbered 1, 2, 3, 4.
Set four fuse boxes to the correct frequency![Fuse box]()
 YouTube video showing all fuse box locations
 A fairly simple step here. Locate the four fuse boxes around the map and set their colour (red, green, blue) to match the sequence on the control panel you just turned on. There is even a large map on the wall to help you understand where the four fuse boxes are. The boxes are numbered 1, 2, 3, 4 - make sure you set each box to the matching colour.
This is a timed event so be quick and sprint as much as possible.
Locations:
- Power Station #1 – Control room, to the right of the power grid machine
- Power Station #2 – In sewer, near door to Mortuary
- Power Station #3 – In sewer by Pack-a-Punch, near door to the Riverside
- Power Station #4 – Outside the Pub building
Activate the Power GridOnce all four fuse boxes are correctly set, the objective changes to activate the power grid again. Return to the control room, interact with the control panel and repeat the fuse box task once more.
Activate and defend the central lightning rod![Tower switch]()
Go to the outside area where the tall tower is. It's in one of the far corners of the map, away from spawn, through the bar and near the burning truck. Pull the level at the bottom of the tower, as shown in the image above. The centre of the lever will rise up into the tower. In classic zombies style, defend the tower from attacking zombies for around 60 seconds. A long audio quote will play from Dr Strauss.
Activate and defend both secondary rods simultaneouslyOn either side of the tower you just defended there are two additional switches. Pull both of these and repeat the defence step again, preventing zombies from destroying either of the rods.
Activate the Right Hand of GodReturn to the underground chamber area in the salt mines and interact with the giant hand to complete this step.
The Left Hand of God
Investigate the Left Hand of GodSimply walk up to the right hand pillar in the chamber and interact with it.
Get another generator from the ZeppelinThis objective overlaps the Zeppelin quest below.
Zeppelin Quest
![Zeppelin]() Investigate the turmoil in the village
Investigate the turmoil in the villageReturn to the outside area and spot the huge Zeppelin floating in the sky.
Damage the Zeppelin enough to release a generatorFor this step, keep on the move as you circle around the map and stay clear of regular zombies. Watch out for the Zeppelins electric attack which hammers down from above. Aim precisely for the front side of the airship to "pop off" a part which falls to the ground. It's the glowing red light on the underbelly of the airship that you should aim for.
Eliminate enemies near the generatorKill zombies in close vicinity to the crashed object, red sparks will fly from dead zombies if done correctly.
Attach battery to the Left Hand of GodPick up the battery object from the floor and carry it to the Left Hand of God in the chamber. It's a heavy object and you won't be able to shoot whilst you carry it. If playing SOLO, clear the round of zombies first, leaving just one or two alive.
Survive until the next ZeppelinComplete the current round and another Zeppelin will spawn into the sky. Collect another generator by shooting down the other red light on the airships underbelly.
Repeat the process of shooting the Zeppelin generator, recharging it and bringing the battery to the chamber THREE times.
The Voice of God
![Scanning paintings]() Let the tones ring at the Voice of God
Let the tones ring at the Voice of GodInteract with the middle pillar in the chamber.
Scan the paintings with flamer zombies headUsing the flamer zombies head (remember you killed him in the control panel), find and scan four paintings around the map. Take note of the symbol and number on each of the paintings - you will need to enter these numbers soon.
Painting locations
YouTube video showing all painting locations- Painting #1 – Inside Mortuary
- Painting #2 – Inside the Pub
- Painting #3 – In the Courtyard
- Painting #4 – In sewers, to the left of Pack-a-Punch
Return to the salt mines chamber and use the middle device to spin the counters (numbers) on the sides, matching the number with the symbol you saw in the paintings.
Get the handle of Barbarossa's swordInteract with the large pillar directly in front of the giant statue in the chamber room, a mist will descend on the sword in the stone.
The Hilt
The Hilt quest is a simple one. Shoot Barbarossa's Hilt (sword handle) with the Tesla cannon and then pull the sword handle out of the stone.
Warning: This is the point of no return. If you want to attempt the
main Easter Egg then do NOT complete this quest.
The Panzermorder - BOSS Fight
![The Panzermorder]()
A lovely little cutscene now plays and the boss fight begins.
For a full guide to killing the BOSS see the separate guide.
In short, to kill the boss:
- Shoot down generators from the airship
- Wait for the boss to get close
- Stagger the boss by shooting him
- Pick up the battery and interact with the boss when he's down
- Repeat several times until he gets winched into the air.
Rewards
Barbarossa's Sword Artifact
![Barbarossa's Sword Relic]()
If done correctly, the first ending cutscene plays and you are rewarded with a Artifact that looks like a hammer but is in fact the handle piece of a sword. This is the first part of the Easter Egg side of the inventory screen.
The Fireworks achievement is also yours at this point because you completed the requirement to "retrieve the artifact".
Congratulations you have successfully completed all of the quests! You can now move on to the harder Easter Egg and complete the right side of the inventory screen.