Zombies Der Eisendrache - How to get Wrath of the Ancients (Bow)
Posted in
black ops 3
The Wrath of the Ancients is one of the new Wonder Weapons in Der Eisendrache and it's surprisingly easy to get as well. Probably the hardest part is finding the locations of the dragons and knowing where to go after these steps. All will be revealed in this tutorial, helping you get your mitts on the bow weapon in less than 20 mins.
The bow is not an unlimited weapon and each shot consumes arrows. You start with 60 arrows though which isn't bad for a Wonder Weapon. There are two forms of attack: a regular fire attack (quick press of R2) and also a charged attack (hold down R2). The charged attack is more powerful of course but it consumes more arrows.
Players can upgrade the bow to other forms: electric, ice...by completing a series of quests. Each quest requires you to complete tasks using the bow such as setting distant objects on fire. This is a similar process to the Staff upgrade process in Origins.
Video Tutorial
For those of you who like a video tutorial see the YouTube video link below to help you get the bow:
 YouTube Walkthrough video
 Otherwise, keep reading for the full text guide...
Wall Dragons
First of all let's start with the dragons and understanding what they do.
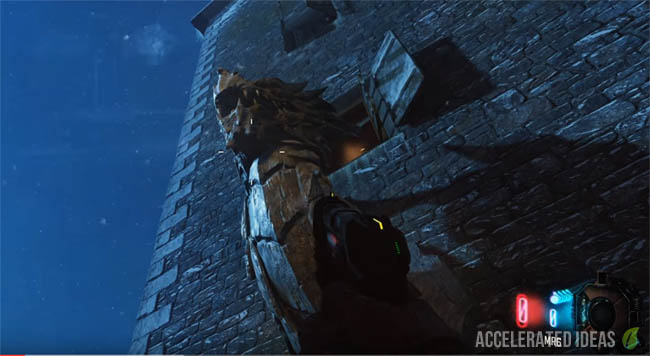
Around the map there are three dragons that come alive when you kill zombies in the vicinity. They are exactly the same as the dogs from Mob of the Dead and players need to feed each of the dragons separately until the little serpent guys are full up, at which point a little musical tune plays and they turn back to stone.
One such dragon is visible early in the game after you buy your way through the gates leading to the courtyard. It starts as a gargoyle on the wall but after killing the first zombie he soon comes to life.
Dragon Locations
Dragon #1
The first dragon mentioned above is found in the courtyard. Steps to reach this location from spawn are shown below:
- Buy your way through the door on the right.
- Open the gate leading to the castle courtyard
- Walk to the top of the courtyard.
- The dragon is on the left.
Dragon #2
The second dragon is inside the research lab area. This area is where all the yellow technical equipment is found and it's accessible via the opposite route from spawn or by continuing from the Power Switch. Follow either of the steps below:
From spawn- Go up the stairs to the second level
- Open the gate leading down the tunnel (not far from Quick Revive)
- Venture up the tunnel and open the gate at the top
- Walk straight to the back of the open area, then take the stairs up
- Open the door to the research lab
- Go down the stairs and circle around
- The dragon is on the far wall of the research lab
Or, from the Power Switch- Go outside (behind Power Switch) where the second PaP teleporter and Death Ray trap are
- Go down the stairs
- Venture through the door to the research lab
Dragon #3
The final dragon is inside the pyramid room. There are two ways to reach this area, choose one of the options below:
From the research lab- Find the perk machine in the lab
- Take the tunnel next to the perk machine leading downstairs
- Follow the route until you arrive at the pyramid room
Or, from the spawn point- Open the right door
- Open the gate to the courtyard
- Walk to the dragons location
- The locked door below the dragon leads down to the pyramid room (you must turn on the power first).
Where to pick up the bow
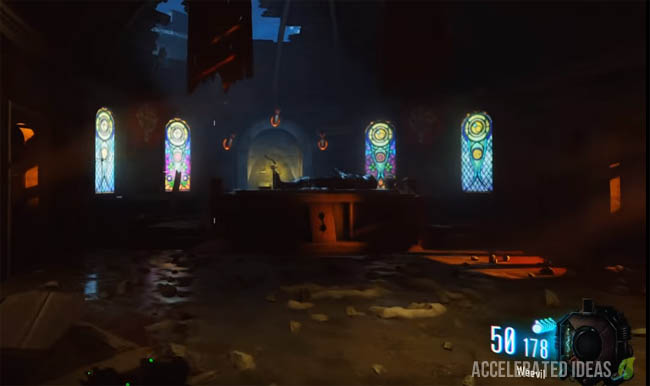
Once all of the dragons are full and they've turned back to stone, then you can pick up the Wrath of the Ancients bow. The actual location is inside the room with the stain glass windows and the knight's tomb.
It's very easy to find if you're already in the pyramid room. Just take the path leading upstairs and the knight's tomb will be straight in front of you. Look out for the yellow glow at the back of the room, this is where you pick up the bow weapon.
Upgrade the Wrath of the Ancients
Players can upgrade the bow and acquire new arrow types. Each of the alternate forms is incredibly powerful.
Electric/Lightning Bow (Purple)
YouTube Walkthrough videoBelow are the steps required to upgrade to the electric purple bow:
1. Hit the Weathervane![weathervane]()
Stand near the Death Ray contraption, then immediately look skywards for the Weathervane. This little device faces the direction the wind is blowing and is typically found on top of barns. Shoot it with the bow to start the Electric upgrade quest.
Just below the Weathervane, a purple item will drop. Pick up the item to accept the quest.
2. Light the fires![Light the fires]()
Use the bow to light fires by burning piles of logs. These logs are outside the bounds of the map so players need to fire arrows with good accuracy.
- The first bonfire is located up the mountainside to the right of Wundersphere in the Rocket Launch site.
- The second bonfire is near the spawn location. Head through the right hand door, peer over the edge and you'll see the logs in the distance.
- The final location is upstairs near the Death Ray machine. Go over to the balcony near the Clock Tower, peer over the edge to the right and you'll see the logs in the distance.
Once you have lighted all three logs, the Quest icon will appear to signify that you've completed a part of the upgrade.
3. Wall running on symbols in pyramid room![Wall running]()
The next part is really hard. Start the anti-gravity process by standing on the pyramid plates. Then jump on the wall and wall run around the entire room, stepping on the blue wind icons as you go round. You must step on all five icons without touching the ground to achieve this step.
4. Fill the urnsThe next step is to fill the purple electric urns with zombie souls. Simply kill zombies in close vicinity to fill urns - about 10 zombies will do.
The urn locations are:
- In the small room to the left of the Death Ray (above Double Tap).
- Opposite the teleporter in the Rocket Launch site.
- In the Clock Tower room.
As soon as the urn is full, walk up to it and hold the fire button to draw/charge your bow (the arrow should be electric). Now go over to one of the burning log locations (from step 2) and fire the electric arrow at the burning logs. With any luck you'll hit the logs which will then burn and spark with electric.
Repeat this process three times for each of the urns and burning logs.
5. Pick up the electric arrow and charge itYou can now pick up the electric arrow from the Weathervane location (near Death Ray). Take it downstairs into the pyramid room, place it on the chest. Now charge the arrow by killing zombies in the vicinity.
After about 15 kills (when no more souls are charging the arrow), place your bow in the chest and the arrow will change into a brand new upgraded electric bow which you can pick up and use.
What does the purple bow do?The upgraded lighting bow is like a mini-electric storm. It swirls around attracting nearby zombies and electrocutes them instantly. The radius of the attack is substantial, making this the most powerful bow and the upgrade process well worth the effort.
Fire Bow (Red)
YouTube Walkthrough video 1. Shoot the wall behind clock![Red circle on wall]()
Enter the Clock Tower (near by the Death Machine) and ascend the stairs to the first level. Fire the bow at the red circle on the wall to reveal the back of the clock face.
The quest item will appear, interact with it to start the fire upgrade quest.
2. Shoot the fireball at Rocket Launch siteGo to the Rocket Launch site and wait for the rocket countdown to start. Retire to the safe teleporter room and wait for the doors to reopen. Immediately sprint into the rocket area, turn 120 degrees to your right and shoot the red fireball with the bow.
3. Shoot ritual circles![Ritual circle]()
Use the launch pads to fling yourself in the air and shoot each of the three ritual circles. A successful shot will turn the circles a permanent glowing red colour.
4. Charge the ritual circlesStand in each of the ritual circles and kill zombies in close vicinity until they project a circle of fire.
5. Find the apothicon symbolGo back to the Clock Tower (in step 1) and press square beside the clock to spin the cogs. An apothicon symbol will appear.
6. Find and shoot fireplaceNext you need to find the fireplace which has the same apothicon symbol, shoot an arrow at it then hold Square. However, it's not as simple as just walking up to the fireplace and firing the bow.
You MUST stand within the red ritual circle (that is still glowing) and use four arrows to bunny hop to the fireplace. Each time you shoot an arrow, a boulder will appear on the ground where the arrow landed. Move beside this boulder and fire the next shot, repeating this technique all the way to the fireplace.
If you use more than 4 arrows you will fail and you must wait for the round to end before trying again.
There are three possible locations for the fireplace:
- In the research lab (control center)
- Edwards room
- In the upper room near the Dragon, just beyond Double Tap
Tip: The glowing ritual circle should be closest to the fireplace with the matching symbol.
7. Interact with glowing red ball near Death RaySimply walk up to the glowing ball, press Square and it'll transform and explode.
8. Charge the arrow in pyramid roomTake the arrow down to the pyramid room, place it in the chest and charge it by killing zombies nearby. After enough kills the fire bow is yours to collect.
What does the Fire Bow do?When charged the Fire Bow creates a wall of molten rock that catches enemies and burns them on the spot. Simple shots also leave a trail of fire on the floor, causing a burning effect to zombies.
Wolf Bow (Green/Blue)
YouTube Walkthrough video 1. Interact with the paintings![Painting with wolf symbol]()
Find and interact with the 4 paintings that have two dog head symbols on them. The locations are:
- In the Clock Tower - knight has a shield with two dogs heads.
- Lower level of the Clock Tower - fire burning and a shield with a sword behind it.
- Near the armoury, not far from Samantha's bedroom - knight is carrying a flag with two dogs heads.
- Upstairs in research lab - knight has a shield with two dogs heads.
The exact order you have to interact is random, a buzzer noise will sound if you select a painting in the wrong order. Afraid trial and error was the only way to get this done. If you interact with all paintings in the right order a Wolf will howl.
The quest item then drops directly behind the pyramid, at the bottom of the stairs leading up to the knights tomb, you will see a symbol of the two green wolves heads on the wall.
2. Hit the flagTeleport to the Rocket Launch site, face the rocket and turn right. Look up the mountainside to spot the flag then shoot an arrow at it. A direct hit will drop a skull.
3. Charge the wolf![Charge the wolf]()
Take the skull and go back to the pyramid room. Insert the skull in the chest and wait for the wolf to appear.
Follow the wolf around, wait for him to stop and dig, then kill zombies in close vicinity to charge the wolf. You may have to repeat this step a couple of times as you follow the wolf around the map.
4. Fire arrow through the wallThe wolf will now sit down and look up at the wall. Take note of this location because it's time for some anti-gravity wall running again. As you pass by the crack in the wall (where the wolf is looking) fire a pinpoint arrow through the gap.
If done correctly a new platform will appear, jump on it and press square. A skull will materialize and hand you the ice arrow.
5. Charge the arrowThe final step is to charge the arrow by placing it in the chest near the pyramid then killing zombies in close vicinity. Once the arrow is fully charged it becomes the upgraded wolf bow which you can pick up and use.
What does the Wolf Bow do?Some players refer to the Wolf bow as the Spirit Bow and you can understand why. It's attack simply obliterates zombies, revealing their souls as they instantly disappear. It's got a cool pass through effect so groups of zombies are wiped out in a single shot.
Shadow/Void Bow (Purple)
YouTube Walkthrough video 1. Shoot the wall symbol![Void symbol on wall]()
Above the main gate to the courtyard (gatehouse) there's a symbol on the ceiling. To shoot this symbol you need to venture into the courtyard, head up the stairs to the second level. Then enter the room just before the Wundersphere. Shoot the symbol using the bow to drop the quest item which can be picked up just next to the Gobblegum machine.
2. Melee zombie in Clock Tower![Purple urn]()
Go to the lower level of the Clock Tower, there you will find a purple symbol on the floor. For this step simply melee kill a zombie (while the bow is equipped) in this room. A purple urn will pop out of the ground and rise up in the air.
3. Find the 6 skullsThe skulls are found in the following locations:
- On a window ledge, on the upper level of the Courtyard, not far from the Research Lab (command center).
- On the wall by Mule Kick.
- On the ledge by Double Tap.
- Inside Samantha's toy box.
- In the sink in the teleporter room.
- In the back of the truck in the Rocket Launch site.
4. Make crawlers in urn roomReturn to the urn room and make 6 crawlers, one for each of the markers on the floor. The crawler souls are collected into the urn automatically. At the end of the process shoot the urn with your bow.
Important: Listen carefully to the three words.
5. Kill zombies to collect orbsKill several zombies in the bastion area (where the Death Ray is) and collect the purple items (x 6). Now go to the knight statues in the armoury and place the purple orbs in each of the knights that correspond to the words that were spoken in step 4. E.g crown, griffin, door. Each time you press Square next to a knight, an apothicon symbol will appear. Make a note of the three symbols.
6. Shoot the matching symbols in the urn roomUse the bow to shoot the corresponding apothicon symbols on the floor of the urn room. You must shoot the symbols which match the words that were spoken in step 4. The symbols will float in the air and eventually the reforged arrows will appear.
7. Fill chest with soulsTake the arrow to the chest in the pyramid room. Now kill zombies in the vicinity to charge the arrows, eventually transforming the arrow into the fully fledged Void/Shadow Bow.
What does the Void/Shadow Bow do?This particular bow has a unique charge attack that creates little pockets of void. Out of these voids appear keeper skulls that home in on zombies and kills them.
More information coming soon...