Zombies The Final Reich - How to Upgrade the Tesla Weapon (Midnight, Hurricane etc)
Posted in
cod ww2
The Tesla Wonder Weapon in the Final Reich zombies map can be upgraded in various forms to gain the Midnight, Hurricane, Reaper and Bloodthirst versions. Each version changes the effects of the Tesla weapon providing more substantial attacks. These variants are also important for the main Easter Egg and particularly the final BOSS fight.
In this guide you'll find a complete walkthrough for upgrading the Tesla to each of the variants, helping you achieve the Dark Arts trophy/achievement.

How to upgrade the Tesla
Index
Tesla Midnight Upgrade
The Midnight version of the Tesla cannon is the green version that fires a green laser that conducts to nearby zombies almost immediately. The upgrade process is fairly easy and can be completed fairly early in the game.
 YouTube video for Tesla Midnight upgrade1. Kill the Flamer zombie and collect his head
This flamer zombie appears during the Tesla construction quest. Kill this zombie and pick up the zombie head to scan for secret objects later.
You're going to have to drop the head somewhere for now so make a note of where you place it for later.
2. Complete the lightning rod quest objectiveComplete the quest that asks you to charge the lightning rods in the Tower. This is one of the God quests, either Left Hand or Right Hand. It's the quest where you need to protect the lever for 30 seconds.
3. Scan the statue in the Courtyard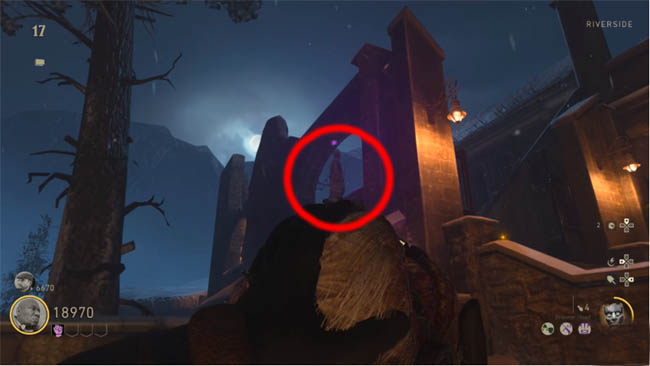
Pick up the zombie head again from step 2. Go outside to the Courtyard area, use the zombie head to scan the statue on the broken stone wall, shown in the image above.
Then shoot the statue using the standard Tesla cannon to make it explode and drop a battery.
4. Pick up battery, place in holder and charge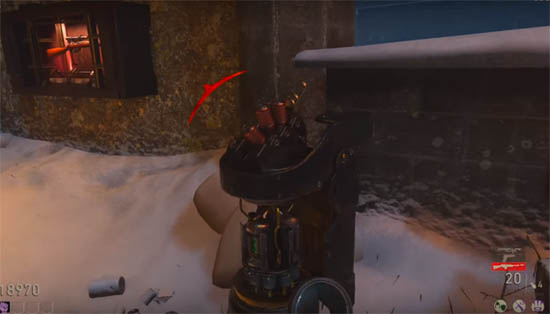
Pick up the battery from the floor and place it into the nearby holder, shown in image above. Get zombie kills using the nearby trap (IMPORTANT!) until the battery is fully charged and zombies no longer create the red sparks when killed.
5. Pick up battery and carry to Tesla station in Lab![Tesla station in lab]()
Carry the battery from the Courtyard and place it into one of the empty slots beside the Tesla station in the Lab. This is the area where you created one of the Tesla parts earlier in the game. The image above best describes this area and the arrow points exactly where the battery needs to be placed.
6. Defend the areaDefend the area for about 2-3 mins before a new Tesla part drops out of the machine. Pick this up.
7. Complete Tesla weapon upgrade![Tesla midnight uograde]()
Return to the upper platform of the Command Room, where you originally claimed the original Tesla weapon. Place the Tesla into the machine and wait as the upgraded Midnight Tesla cannon is now yours to keep.
Tesla Bloodthirst Upgrade
1. Shoot the lights![Tesla Bloodthirst upgrade]()
For this step you'll need to shoot a series of lights as quickly as possible as you work your way through the Village and ending in the Morgye. Your starting point is the snowy path, at the top of the Riverside wooden platform. Look up at the street lamps.
Each time you shoot a light, you'll hear an echod PaP'd weapon sound.
Ok, shoot the first street lamp and work your way onwards, shooting each light as you head down the snowy path beside the Riverside, past the Pub, heading into the Village Square, into the Bunker, through Command Room and ending in the Morgue. Most lights are on your right hand side, but this switches to your left as you enter the bunker.
Finally, the Bloodraven-Atunned will drop.
2. Charge the batteryPick up the battery from the floor and place it into the holder in the corner of the Morgue room (same room you earned the drop in step 1). Now kill PEST zombies using the spiked floor trap to charge the battery. This MUST be during the pest round (when the fast skeleton zombies appear).
3. Carry battery, place and charge![Bloodthirst battery charging]()
Carry the charged battery to the Tesla build station shown in the image above. This is the large red cylinder that you used during the original Tesla quest. Get kills close to the cylinder to charge the battery.
4. Complete the Bloodthirst upgradeTake the new Tesla part and return to the Command Room to complete the upgrade on the upper platform.
Tesla Reaper Upgrade
![Tesla Reaper upgrade]()
The Reaper upgrade is certainly one of the most fun to see. It's the red variant of the Tesla weapon which provides a delayed explosion on impact.
1. Get the battery![Reaper battery]()
The battery for the Reaper upgrade is hidden inside a compartment near to the PaP machine in the sewer. You need to smash the panel open to reveal the battery. To do this, wait until about round 7+ when a saw zombie spawns in (the guy with the huge spiked hand).
Tease the zombie to charge at the compartment wall to smash it open. The best way to do this is to stand beside the wall shown in the image above.
2. Charge the batteryPick up the battery and place it into the holder, in the same PaP room. The holder is on a wall arch, very close to the PaP table. To charge the battery you must kill "bomber" zombies in close vicinity.
The best way to do this is leave the salt mines quest alone until you want the Reaper upgrade. Opening the salt mines gate will spawn in four bombers, two of which is enough to fully charge this batter.
You MUST use the saw trap to kill the bombers. Wait until they are very close to the battery before activating the trap.
3. Complete the lightning rod quest objectivesYou must complete the lightning rod quest steps first, the one where you defended the levers in the Tower and the two smaller Towers.
4. Carry, place and charge battery![Reaper battery charging]()
Pick up the Deathraven-Attuned battery and carry it to the Tesla machine shown in the image above. Get zombie kills for 2-3 mins here until a new part appears from the machine.
5. Complete the Reaper upgradeFinally take the new part to the Command Room and use the Tesla crafting table on the upper platform to complete the upgrade.
Tesla Hurricane Upgrade
![Hurricane Tesla variant]()
The Hurricane Tesla weapon is the purple variant of the weapon. It fires a purple sparking ball that blasts zombies away with a powerful wind blast.
1. Get the battery![Hurricane battery]()
Like the Reaper upgrade, the Hurricane battery is hidden inside a compartment. This time the compartment is in a little stairwell close to the Electric Cherry perk machine in the Laboratory. Check the image above for exact location.
Tempt a bomber zombies close to the hidden compartment and kill him to explode the wall panel off.
2. Charge the battery![Hurricane battery charging]()
Pick up the Stormraven-Attuned battery and take it to the electric chamber trap. Tease two large zombies with the saw arms (with spikes) into the chamber, turn on the trap to kill and charge the battery.
3. Complete the lightning rods questComplete the Tower objective where you defended the levers. Part of the Left or Right Hand of God.
4. Carry, place and charge the battery![Hurricane battery holder]()
Pick up the battery, carry it to the Tesla machine shown in the image above. Defend the battery for 2-3 mins until a new Tesla part comes out of the machine.
5. Complete the Hurricane upgradeCarry the new part to the upper level of the Command Room and complete the upgrade on the Tesla crafting machine.