Zetsubou no Shima - SOLO Strategy Guide
Posted in
black ops 3
After playing Zetsubou No Shima religiously for the past few days, I decided to create this strategy guide to help others enjoy the SOLO experience as well. The more I play this map the more I come to love DLC 2; there's a real difficulty barrier that keeps you coming back for more and only then can you truly appreciate Zetsubou for everything it has to offer.
Treyarch's second DLC zombies map for Black Ops 3 is by certainly one of the harder SOLO zombies maps that we've seen for some time. Not only is it a large map but it's also an expensive map - you're going to need alot of points to open everything up and buy the perks you admire the most. Although the Easter Egg is relative short, the map is jam packed with great features and mini-easter eggs that'll keep you going for a long time to come.
This guide is NOT intended for those who rely upon Perkaholic, Wall Power or any of the other Mega Gums that reduce the difficulty level artificially. Instead, this is a SOLO strategy that you can use to enjoy without any glitches, cheats or reliance on RNG. There's nothing wrong with Gobble Gum mind you, but I feel it's worth mastering the map from scratch and then opting for GG for those really high round challenges.
Ok, so let's get to it...
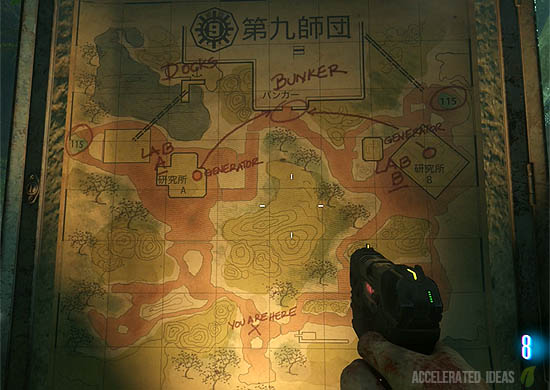
HD Map
Please refer to this HD map for landmarks and layout:
General Tips
Not focusing on a particular map for a minute, there's a collection of strategies which are vital for any zombies map, many of which have been around since the dawn of Treyarch zombies. I want to cover these first because they make a huge difference for any SOLO strategy.
Use your knife
Knife kills are worth a hell of alot more than weapon kills, that's a fact. Knife kills become increasingly weaker (and riskier) as you progress through the later rounds (unless you have the Bowie Knife of course). Make the most of the early rounds and knife zombies for maximum points. Round 1 is a single knife per kill, Round 2 is two, 3 is 3 etc. You can continue this strategy up until about round 5 or 6 by combining a light SMG spray with a final knife for the actual kill. You'll get some nice points and also the important knife kill points on top.
High rate of fire low impact guns
SMG's and some Assault Rifles are the best weapons for early high point rounds. These guns take more hits before they finish a zombie off; more hits equals more points. As you creep nearer round 10, you can spray an entire clip before a zombie dies, thus providing tonnes of points per round. Of course you need an ample supply of ammo for this to work so choose a wall gun which is within your favourite train spot, making it easier to top up ammo and repeat the process consistently.
In general, avoid shotguns, grenade kills and sniper rifles early in the game.
Save Double Tap for later
Double Tap is a great perk, almost a replacement for Pack-a-Punch in the mid rounds. However, don't make the mistake of buying Double Tap too early. What you don't want is quick time to kill because you'll sacrifice points. Instead opt for the low impact, high rate of fire weapons that will rack up the points.
Zombie shield
The
shield buildable is arguably more important than Jug. If you're running train spots then getting hit from behind is a common occurrence, whilst attacks from the front are usually avoidable. Building the shield and leaving it on your back provides complete protection from rear attacks. After some time the shield is destroyed of course but then it's simply a case of replacing the broken one for a brand new shield from the workbench.
Power-Ups
Most power-ups are useful; I'm talking about Double Points, Insta-Kill, Max-Ammo and Carpenter. However, the Nuke power-up is one to avoid entirely at the beginning or middle of a round. The best time to use a Nuke is right at the end of a round, or while you transition from one round to another. This avoids killing any zombies which would otherwise give you more points.
Find a training spot
Training spots are a particular area of the map where you can "pile up" zombies in a line behind you, usually by running circular routes in the same direction. Once you have enough zombies lined up you can turn and fire consistently to provide a constant stream of points with a greatly reduced chance of missed shots.
Having a comfortable training spot is one of the most important parts of any zombies map. These spots should provide the following benefits: a good wall weapon, enough space to avoid zombies, alternative mini-routes to avoid getting trapped and a small enough area so zombies do not de-spawn while you stack them up behind you.
Plant Types
There are four different types of coloured water in the game (green, blue, purple and rainbow) that are used to grow a variety of plants. To grow a plant the player has to plant a seed in one of the plant locations and the feed that plant water. Successfully feeding a plant water for three successive rounds will grow a fully matured plant, who's type is determined by the water used. Forgetting to use water or missing a round will cause the plant to mature with a low tier reward.
The list below gives a general overview of each plant type and it's uses.
Standard plants
3 x green water - grows a "venus fly trap" style plant that catches a zombie and holds it for around 5 minutes. That plant is an absolute must in SOLO to give you time to open other areas of the map and complete Easter Egg steps.
3 x blue water - grows a reward plant that offers things such as power-ups, points and weapons.
3 x purple water - grows a plant that attracts nearby zombies and kills them. This is also a great plant for SOLO players but should be used at higher rounds to provide a distraction without the concern of missing out on points.
1 x green, 1 x blue, 1 x purple - grows a fruit plant that has a 25% chance of rewarding a random perk.
Upgraded plants
3 x green water + KT-4 shot - grows the familiar "venus fly trap" plant but this version holds a zombie indefinitely.
3 x blue water + KT-4 shot - grows a special reward plant that rewards an Easter Egg part (AA shell), perk bottle, monkey bomb and sometimes bowie knife.
3 x purple water + KT-4 shot - attracts more zombies and kills faster.
Golden bucket
A fantastic item for saving time - the Golden Bucket never runs out of water and also allows you to automatically switch the type of water you are carrying (by pressing both analog sticks). It's a little hard to collect though and is only available after you have progressed into the Easter Egg. A seperate guide will be available for the Golden Bucket soon.
Round by Round
Ok let's look at the best SOLO strategy for Zetsubou No Shima.
Round 1
The Skull of Nan Sapwe and the Challenges are two of the harder elements to this map. Make the most of Round 1 to at least check your challenges and also get one of the Skull rituals out of the way.
Use a combination of 6 body pistol shots and 1 knife attack per zombie. This should get you at least 1250 points before the round ends. Make sure you leave one zombie alive so the round doesn't end.
Buy your way through the two doors which lead to the ritual site. Read the Challenges and make a hard choice: do you like them or not? Personally if I see anything to do with Mutated zombies then I generally restart the map to avoid frustration later. If you're happy then carry on.
Pick up the skull from the ritual altar, head back and complete the first spawn ritual without the round ending. Return the skull after and pick up another random skull - take a chance.
Use 6 more pistol shots and a knife to finish the round off.
Round 2
This time it's two knife swipes per zombie kill so repeat the process to get at least 1250 and buy your way through to the Plane Propeller trap. Check the altar symbols and swap the skull for the right one at the ritual and come back to propeller trap.
Rack up a few more points (rebuilding barriers, body shots etc.) without the round ending and buy the Pharo gun from the wall. Start the ritual and complete it before the round ends, then return the skull to the ritual site.
Round 3 - 8
![Lab B train route]()
During the next 5 rounds it's all about points. I prefer to open the path to Lab B and also open the door to the green 115 water area. Leave the lab entrance alone for now. The outside lab area provides a perfect circle with several alternative mini-routes which are ideal if you get trapped.
Work your way round the outer perimeter, using the Pharo gun to collect points along the way. When the time is right, buy the Vesper wall weapon so you have a reliable ammo supply and a light enough gun to collect points. Keep the Pharo as your secondary.
In the back of your mind, keep an eye on the Ritual Challenges - get a couple of these out of the way if you can during these rounds.
Keep repeating the circular route until you reach the end of Round 8 - you should be around the 10,000 point mark. Keep one or two zombies alive because now it's time to start opening things up. Concentrate on the following tasks:
- Turn on all the power
- Build zombie shield
- Buy HVK-30 (Lab A upstairs) or KN-44 (AA gun area in bunker) wall weapon
A big tip for turning on the power: you can actually use X and Circle buttons to ascend and descend while underwater. This is great for resurfacing for air without actually swimming and losing control.
Keep that zombie alive still and make the most of your time to plant 2 x plants at Lab B (one by the green water and the other outside the lab). Feed them both with green water. Plant another plant at Lab A and feed it with blue water for a reward a little later.
Round 9 - 10
![KT-4 workbench]()
End the previous round and go back to Lab B for the familiar training spot. Repeat the same process as before, circling the outer perimeter and relying on the Vesper for kills as much as possible. It will take a little longer to get kills now but the points will mount up quickly. If you find yourself under pressure, switch to the HVK or KN-44 briefly to survive.
Before each round ends remember to water those two green plants and the single blue one. These will be ready by Round 11, just in time. Collect the green part for the KT-4 which drops now that you have turned on the power.
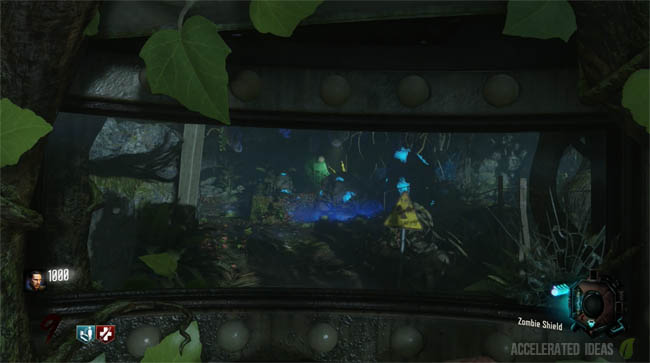
Towards the end of round 10, keep a single zombie alive and head to Lab A. Wait for the single spider to spawn and catch it in the purple cage to get the KT-4 part.
Now complete the following tasks:
- Build the KT-4
- Buy Double Tap
- Buy Jug
Depending on finances think about buying Stamin-Up to lessen the chore of watering plants and running from one side of the map to the other. If you've finished the ritual Challenges remember to use the Electric Shield to melee perk machines for a reduced price.
Now that you have the KT-4 it's time to start growing new plants and feeding them with both blue water and the KT-4, in the hope of the Clone plant (free revives) and the AA shell to shoot down the plane.
Round 11
![Skull ritual using KT-4]()
End the previous round and collect your reward from the blue plant and make your way back to Lab B. Run the circular route and collect more points as you work towards any of the remaining Challenges.
The green plants should be fully matured by now and ready for you to utilize. At the end of Round 11 check that a zombie is trapped in the green plant and then accomplish the following task:
This should be far easier to complete if regular zombies are out of the way and there is no danger of the round ending. Also remember to water the blue plants and shoot them with the KT-4 for the Easter Egg coming up next.
Round 12+
![Building plans poster]()
The hardest parts of the SOLO strategy are now out of the way, it's now just a case of completing the remaining Ritual Challenges and progressing the
main Easter Egg. The following tasks can all be completed in the next 3 rounds:
Depending on your points total and luck with blue plant rewards, you can opt to buy Mule Kick and pull out a great weapon from the Mystery Box. The Marshall 16 or Haymaker are two of the best end-game weapons in Zetsubou no Shima simply because of their awesome stopping power, especially when points are no longer a priority.
The BOSS fight can be completed by round 14 and then it's on to high rounds!!!
I hope this guide has helped you understand some of the SOLO strategies I use in Zetsubou. Enjoy the fantastic map!!