Zombies Zetsubou no Shima - How to Get to Pack a Punch
Posted in
black ops 3
Treyarch have added another of their Pack a Punch puzzles to Zetsubou No Shima. Players must complete a series of steps to unlock the Pack a Punch which is submerged underwater at the start of the game. In this guide I'll explain the series of steps you must follow in order to remove the water and gain access to the Pack a Punch machine.
As every good zombie player knows the Pack a Punch is one of the most important high round mechanics in any zombies map, allowing the player to transform a base weapon into an upgraded form, typically with increased firepower and ammo reserves.
First of all, let's take a look at where Pack a Punch is...
Locating the Pack-a-Punch
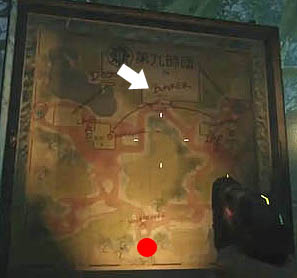
The actual Pack-a-Punch machine is located within the Bunker area of the Zetsubou map. This bunker is a building located in between both of the labs, Lab A and Lab B. Check the image above for the exact location, which you can see is on the opposite side from the spawn point. I have highlighted the spawn point with a red circle and the PaP with a white arrow.
There is only one entrance into the lab at the beginning of the game and in order to open the door you must turn on the power at the labs first.
To do this first find the Bucket item, then fill it with 115 Water (at the rear of either of the Labs). Once the bucket is full of water, rush inside a Lab room and put the water in the Generator. Timing is important - players must fill both of the generators (at Lab A and Lab B) with water in fairly quick succession.
Once the power is on at both Labs, two green lights will appear above the Bunker entrance and it can now be opened. This reveals a corridor through to the Communications Center and the test subjects underground. Head straight from the Bunker entrance and inside to the second room - the Pack a Punch machine is down below in water.
Removing the water
Before you can access the PaP you must open the floodgates that are blocking access to the lower level. To do this you must find several of the Machine Parts which appear in the middle of your inventory screen. Use the machine parts on the upper level to repair the pump machines.
Step 1 - Unblock turbine
Open the door to the left of the Pack-a-Punch for 1500 points (upper level). Follow the route inside and down a single set of stairs to the flooded power room (shown in image above). Turn 180 degrees and swim under the platform. Look to your left for a spider web which is blocking the power turbine. Remove the web using your knife.
Now kill the nearby underwater zombies. Once they are all gone the door/gate will open back up.
Step 2 - Turn on third generator
![Power switch]()
Race back up the stairs to the power generator and turn it on using the switch.
Step 3 - Collect 2nd Machine Tools part
![Machine Tools Part]()
Go back underwater where you just cleared the spider web in front of the turbine. The Machine Part should be floating right in front of you. Now head back to the upper level of the Pack-a-Punch and use the tool to drain the water from the PaP room (interact with one of the machines).
Step 4 - Collect the 1st Machine Tools part
![Machine Tools Part]()
The circular wheel Machine Tool is found underwater again but this time in the smaller caverns that lead from the lower level of the Communications Center. To find these tunnels, follow this route from the Bunker entrance. Continue straight past PaP, down the winding stairs at the back of the room to the lower level. Once downstairs, turn right and open the door for 1500 points. This leads the long and winding underwater caverns.
Navigate the underwater tunnels to find the next Machine Tool part (shown in image above). Use this Machine part on the water pumps above the PaP to drain a little more water from the room.
Step 5 - Collect the 3rd Machine Tools part
![Machine Tools Part]()
The final Machine Tools part is located in the room to the right hand side of Pack-a-Punch. We already explored the left hand side in the previous step so it makes sense to do the right side now.
Buy your way into the room and take note of the dead bodies hanging from the ceiling. One of these bodies contains the Machine part so knife each of them until you find it.
Step 6 - Fix the final pump to open the flood gate
![PaP gate open]()
Now that you have the final part, head to the upper level of the Pack-a-Punch, repair the final pump machine to drain the water completely from the area. The gate down to Pack-a-Punch will open, allowing you to venture forth and upgrade your favourite weapon. Enjoy!!!