Zombies Revelations - Shield Part Locations
Posted in
black ops 3
The zombies shield in Black Ops 3 Revelations is comparable to the one found in Gorod Krovi, indeed it has a suitable fire projectile ability. In this walkthrough, I'll show you where to find each of the shield parts and possible workbench locations, allowing you to build this defensive shield for your own protection.
There's nothing better than having an extra chunk of protection from zombie attacks. This is especially true when considering that the shield automatically offers protection from behind when unequipped. Nine times out of ten, behind is where an unsuspecting zombie can catch you out.
Every good player understands that Treyarch have added some highly lucrative spawn points in Black Ops 3, most of which can easily catch you off guard as you explore the map or attempt to progress the Easter Egg. The shield is therefore an amazing ally!
Part Locations
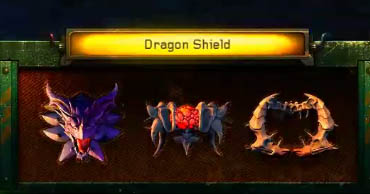
The shield requires three parts, which as ever, have been scattered around the map in the three main segments. Each part moves slightly but will always be found in the same vicinity - this has been the case since Black Ops 2. Check your inventory to see which piece you already have and which ones are outstanding.
Part 1 - Origins

- Location #1 - First crate in trenches
- Location #2 - Second crate opposite car headlights in trenches
- Location #3 - Lower trench on top of wooden chair
Part 2 - Verruckt

- Location #1 - Upstairs in small room with wheelchair
- Location #2 - Upstairs in kitchen, on top of blooded table
- Location #3 - Downstairs near Speed Cola, back side of the pillar
Part 3 - Der Eisendrache
Work your way through the portals, progressing through Nacht der Untoten, Origins, Shangri-La and eventually ending up in the MPD room of Der Eisendrache. The first shield part is on the wall so use the anti-gravity feature to activate weightlessness and wallrun to pick it up.
It can appear in three places but always on the wall somewhere.
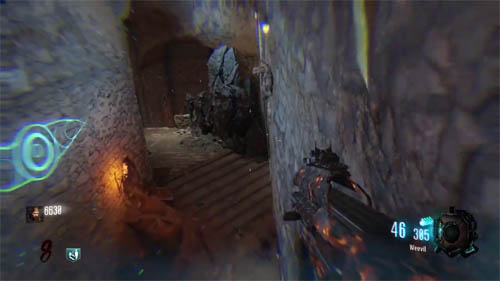
Workbench Locations

After collecting the three parts, it's simply a case of finding the workbench to complete the construction. The shield is then yours until destroyed, at which point it can easily be replaced by revisiting the same workbench where it was constructed.
It's good practice to keep an eye on the shields strength in the bottom right hand corner of the HUD. A red icon indicates that the shield is almost destroyed and you should take a moment to keep one last zombie alive and let him finish that decrepit shield off. Simply rearm with a brand new one for the commencing round.
Workbench Locations
The ONLY location to construct the shield is inside Nacht der Untoten. Head up the spiral stairs and walk in a straight line through to the next room. The workbench is directly in front of you.
There are no other workbench locations on this map.