Zombies Classified - All Easter Egg Steps (Black Ops 4)
Posted in
black ops 4
This detailed guide contains a complete Easter Egg walkthrough for the Classified zombies map in Black Ops 4. Together with full step by step instructions, you'll find map locations, puzzle solutions and screenshots to help you solve the main EE quest and unlock the ending cutscene.
Classified is a remake of the popular Black Ops zombies map called "Five" that was set inside the Pentagon. The map was originally one of two base maps included with the BLOPS game but with the launch of Black Ops 4, the Classified map is only available to those who have purchased the Black Ops Pass (essentially the Season Pass).
Contrary to Blood of the Dead, the layout of the Classified map has only changed slightly from the original. Returning players will easily remember the majority of the map from Five but will notice extra debris, a new PaP location and a slightly larger underground section of the facility. Unlike the original Five map, Classified also contains an extensive Easter Egg and an ending cutscene. This guide will help you complete this EE and unlock the ending for yourself.
About the EE
The main EE trophy for Classified is:
Cold War Remedy
In Classified retrieve and equip the Project Skadi Prototype
Unlike the other more extensive maps in Black Ops 4, the Classified Easter Egg is a rather linear affair and as usual the final reward for completing the EE is a final cutscene.
All Easter Egg Steps
To complete the Classified Easter Egg simply progress to Round 150.
Round 150 is a pretty tough ask but when combined with the current bluescreen glitches it's almost impossible. The only way to currently reach round 150 is to turn on Cartoon Mode thereby reducing the likelihood of crashing the game.
If you would like to see the ending cutscene then watch the DKDynamite video on youtube
hereFree Winters Howl EE
If you would prefer to attempt the easier side EE in Classified, that results in a free Winters Howl weapon, then follow the steps below...
1. Unlock PaP and upgrade weapon
Before attempting the first step, I suggest you unlock the majority of the map, buy perks and save enough money to upgrade your favorite weapon. When ready, find the three PaP parts around the map:
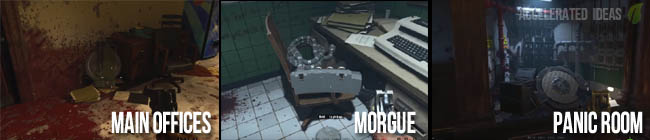
- Main Offices - usually to the left of the perk machine, look for the green/grey circular part
- Morgue (basement area of map) - usually on a chair in the little room, look for the part with the wires dangling
- Panic Room - behind the secret panel that opens when you enter the room. The Panic Room is accessed by interacting with all Def Con switches (to reach Def Don 5) in the War Room then using the teleporter in the middle
Next, go into the basement lab area and head to the Weapon Testing room. Use the workbench to assemble the parts into the "Teleporter Signal Amplifier". Head back upstairs to the War Room Lower Level. Place the signal amplifier on the floor, beside the teleporter you took to the Panic Room.
Activate all five Def Con switches again and take the new spinning PaP teleporter to Groom Lake (Area 51) on the Moon. Here is the Pack-a-Punch machine - use it to upgrade your chosen weapon.
2. Get the drawer key in War Room
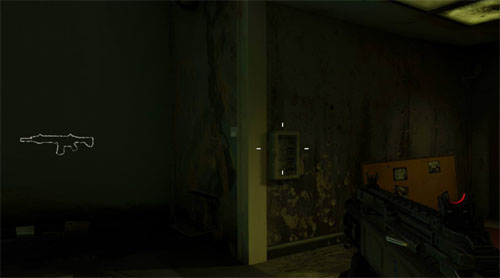
Make your way down to the War Room Lower level. This circular area is where the Def Con switches are and you'll access it early after taking the elevator downstairs from the offices above. Open the barriers that take you down to the lower level of the War Room and look for the key holder on the wall (see image above). Collect the key and we're ready to move on.
3. Get the secret codes
![Secret code in drawer]()
There are four locations to find the secret codes.
1. Main OfficeReturn to the upstairs area and head into the Main Offices. Look for the desk with the coffee cup and large drawer on the front. Approach and use the key to open the drawer. Take note of the code and the photo of a past zombies map. See the image above for exact location.
2. Panic RoomGet to the secret room that's only accessible after going to Def Con 5 (flick all the Def Con switches in the War Room then use the middle teleporter). Once inside the secret room, take note of the rows of monitors on the left side of the room. Push the bottom row, second from the end TV. It should move to reveal another code - remember this code.
3. George Washington NameplateIn the Deserted Hallway (upstairs) there are various portrait paintings and nameplates along the wall. Use a Pack-a-Punch weapon to reveal a code behind the George Washington nameplate. There's some uncertainty to this step, but the general consensus is that portraits must be shot in sequence to reveal the nameplate e.g. Franklin, Hamilton, Lincoln. If in doubt, shoot all portraits one by one randomly, eventually it should unlock.
Take note of the code.
4. Target practice roomGo to the labs and outside of the target practice room throw a grenade in zombie spawn window over the small canister. Another code should appear on the wall next to the window.
4. Input the codes into monitor
![Monitor with four digit input code]()
Head back to the War Room Lower Level and look for the giant monitor and the code sequence to the right. Now enter the codes you found from the previous step. It's important that you enter the codes into the machine in this order:
- George Washington code
- Office drawer code
- Target practice code
- Panic Room code
5. Survive rounds in PaP
Use the teleporter to PaP (Groom Lake) and survive three rounds. A secret area will open to the side, pick up the free Winters Howl.